Jupyter Notebook in VS Code – A step by step
Jupyter Notebook in VS Code allows you to write code, add explanations and view the results without continually switching between an editor and a web browser. A single file can contain Python code, charts, tables, equations and notes. Consequently, notebooks are particularly useful for learning programming, analysing data, testing machine learning models and preparing technical instructions.
In this guide, I shall explain, step by step, how to prepare your environment, create or open an .ipynb file, select the correct kernel and run your first cells. I shall also explain what to do if Visual Studio Code cannot detect Python or the libraries you have installed.
Chcesz przeczytać ten artykuł po polsku – kliknij tutaj.
What is a Jupyter Notebook file?
A Jupyter Notebook is a document divided into cells. Some cells contain executable code, whilst others contain text written in Markdown. The output produced by the code appears directly beneath the relevant cell. It might be a number, a table, a message, a chart or an error that needs to be corrected.
Notebook files use the .ipynb extension. Technically, they are stored in JSON format, although you do not normally need to edit their raw contents. Visual Studio Code presents them in a clear notebook editor resembling a digital laboratory notebook.
Put simply, an ordinary .py file is rather like a sheet of paper containing code. A notebook is closer to a workbook in which code is accompanied by calculations, results, charts and comments explaining each stage of the process.
You can learn more about the notebook format in the official Jupyter documentation.
Why use Jupyter Notebook in VS Code?
A traditional Jupyter Notebook runs in a web browser. Visual Studio Code, by contrast, allows you to work with .ipynb files in the same application in which you edit scripts, manage projects and use Git.
The principal benefits include:
- running code one cell at a time;
- viewing results directly beneath the code;
- IntelliSense code completion;
- creating clear explanations with Markdown;
- inspecting variables and tabular data;
- debugging code;
- exporting a notebook to formats such as HTML, PDF or a Python script;
- comparing changes made to notebooks using Git tools.
This means that you can begin with a small experiment and later incorporate the tested code into a larger application. This approach is particularly convenient when learning Python, analysing data or working with machine learning.
These subjects also feature in the artificial intelligence and Machine Learning training courses offered by ZALNET.
What do you need to use Jupyter Notebook in VS Code?
To work with notebooks containing Python code, you will need:
- Visual Studio Code,
- an installed version of Python,
- the Python extension published by Microsoft,
- the Jupyter extension published by Microsoft,
- a Python environment containing the jupyter or ipykernel package.
The Jupyter extension provides the notebook interface, but it is not itself a kernel. Your code must still be executed by an appropriate environment, such as a Python environment in which the ipykernel package has been installed.
How to install Jupyter Notebook in VS Code
Step 1: Install Visual Studio Code and Python
First, download and install Visual Studio Code. Next, install a current version of Python from python.org or use a distribution such as Anaconda or Miniconda.
Once the installation is complete, open the terminal in Visual Studio Code. You can do this by selecting Terminal → New Terminal. Then check whether Python is available:
python --version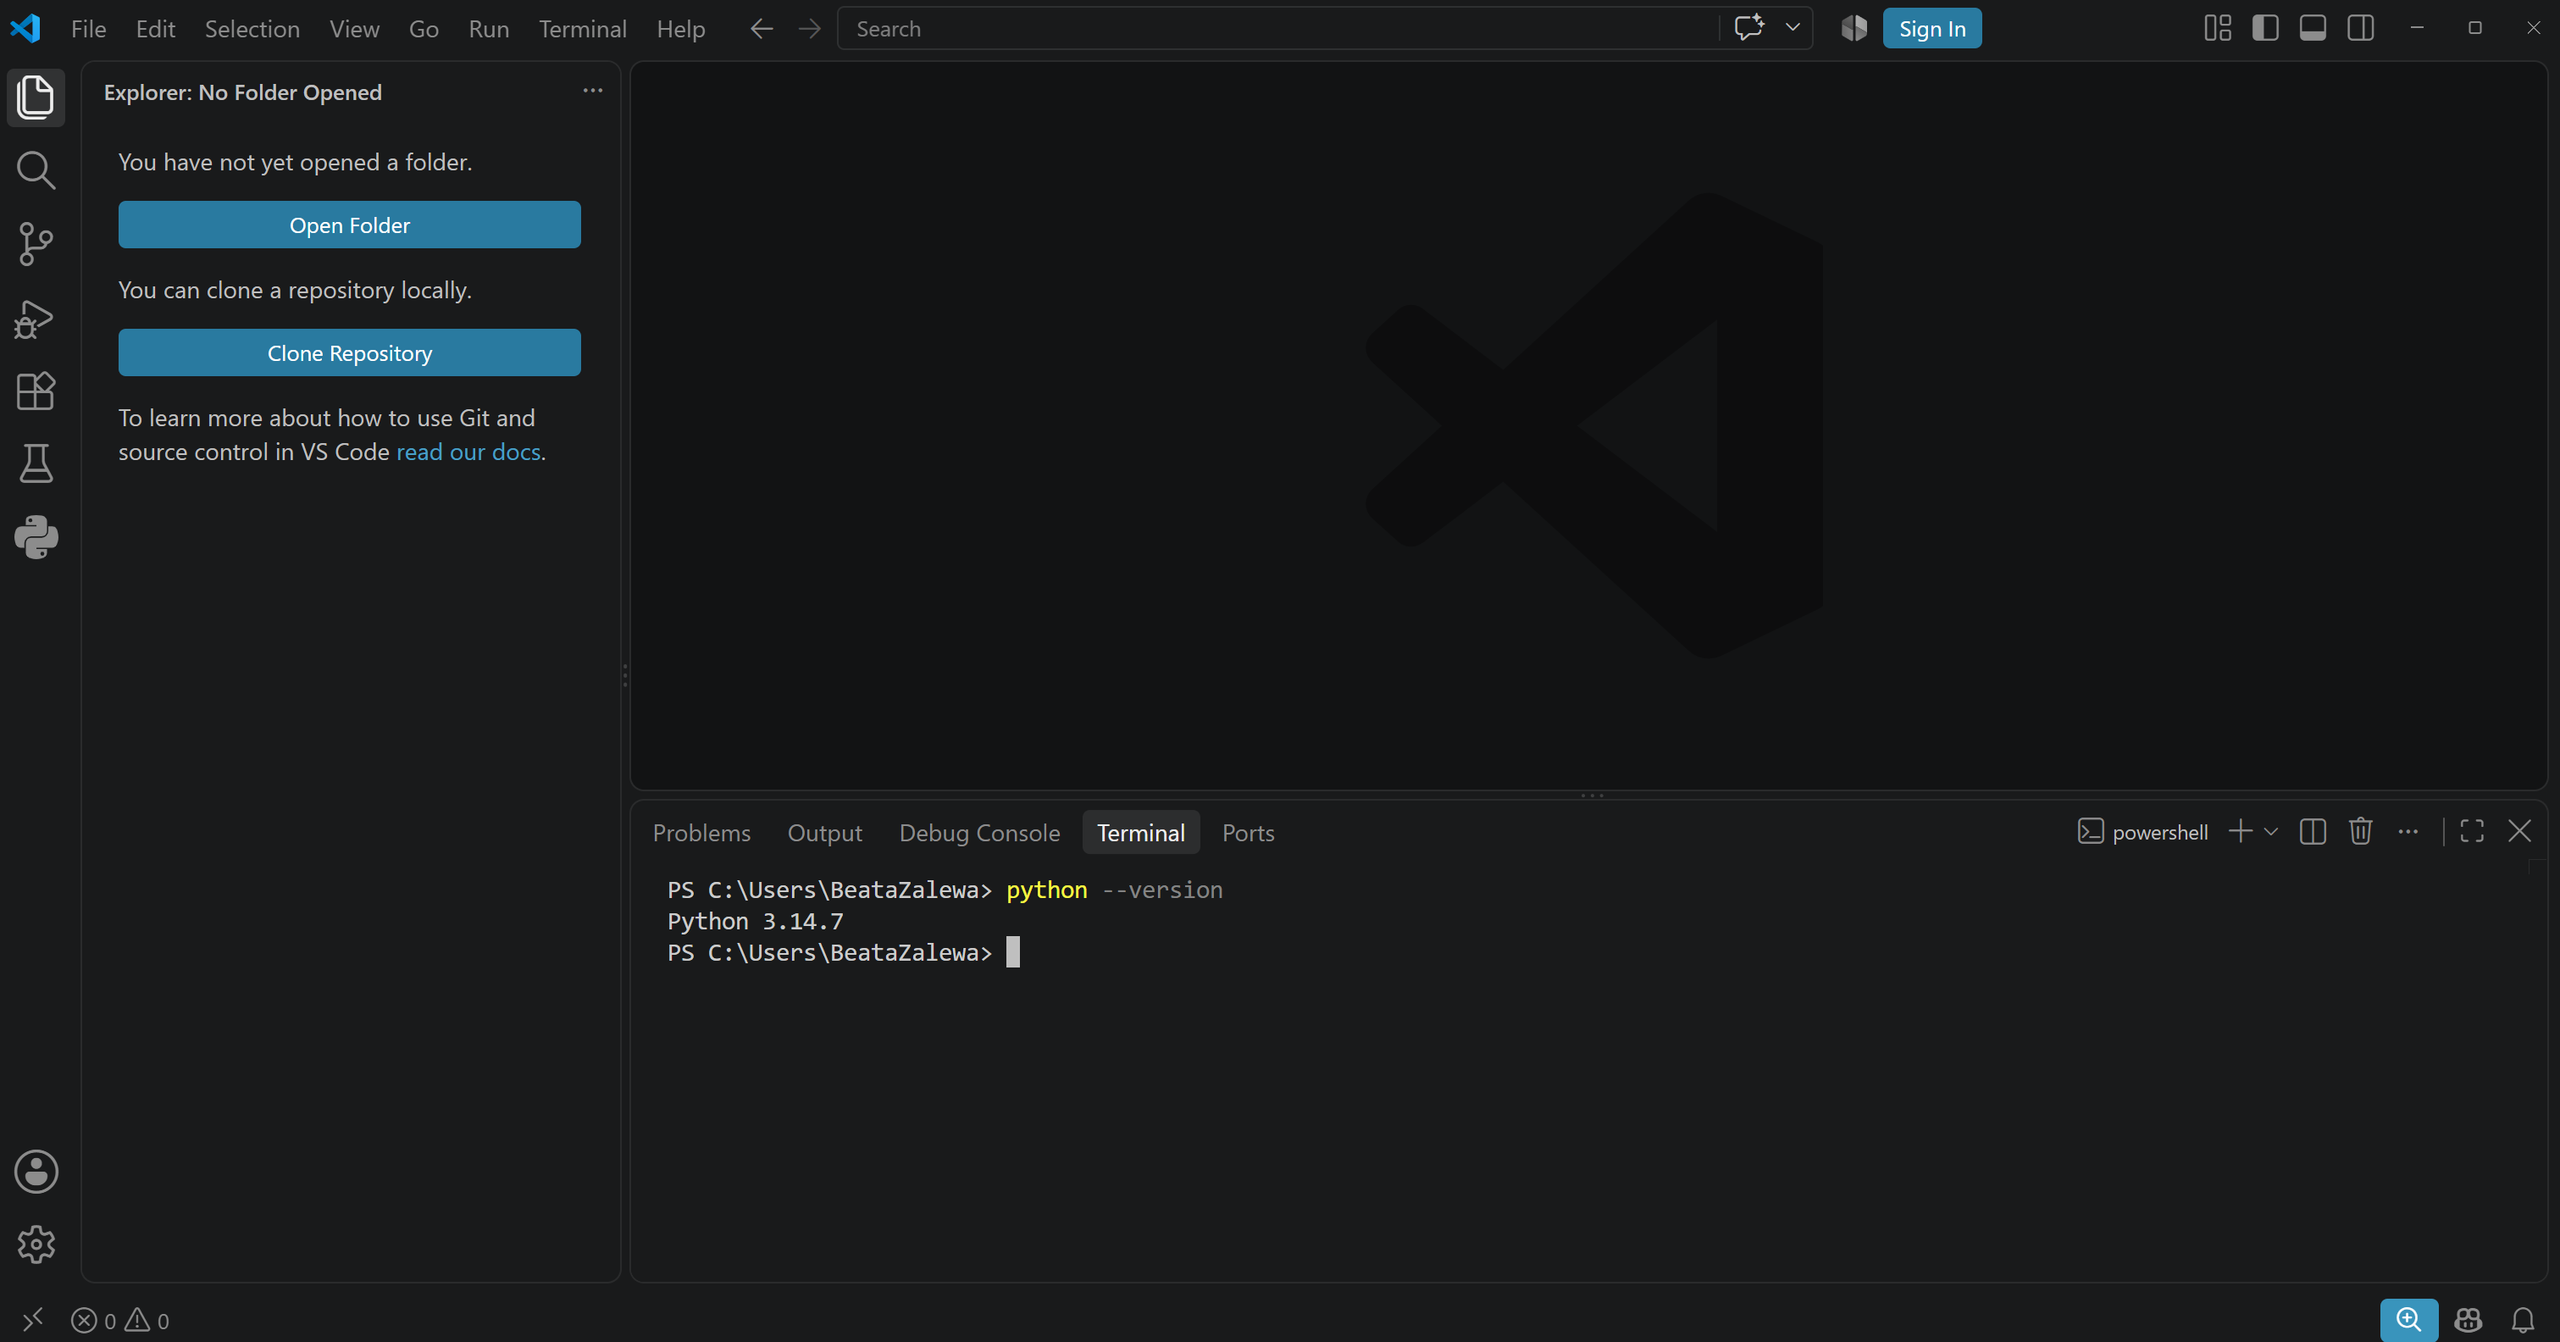
On some Windows or macOS computers, you may need to use the following command instead:
python3 --versionIf the terminal displays a version number, Python has been detected correctly.
Step 2: Install the Python and Jupyter extensions
Open the Extensions view by selecting the Extensions icon in the left-hand sidebar or by using the Ctrl+Shift+X keyboard shortcut.
Search for and install the following two extensions published by Microsoft:
- Python;
- Jupyter.
Avoid installing an arbitrary extension with a similar name. The publisher’s name is displayed on the extension’s page.
You can find the Jupyter extension in the Visual Studio Marketplace. A description of its principal features is also available in the official documentation for Jupyter Notebooks in Visual Studio Code.
Step 3: Create a virtual environment
A virtual environment keeps the libraries used by one project separate from those used by other projects. This allows different applications to use different versions of the same packages without creating conflicts.
A complete explanation of this process is available in our guide: Python Virtual Environment on Windows – A Complete Guide.
Create a project folder, open it in Visual Studio Code and enter the following command in the terminal:
python -m venv .venvOn Windows, activate the environment with:
.venv\Scripts\Activate.ps1On Linux or macOS, use:
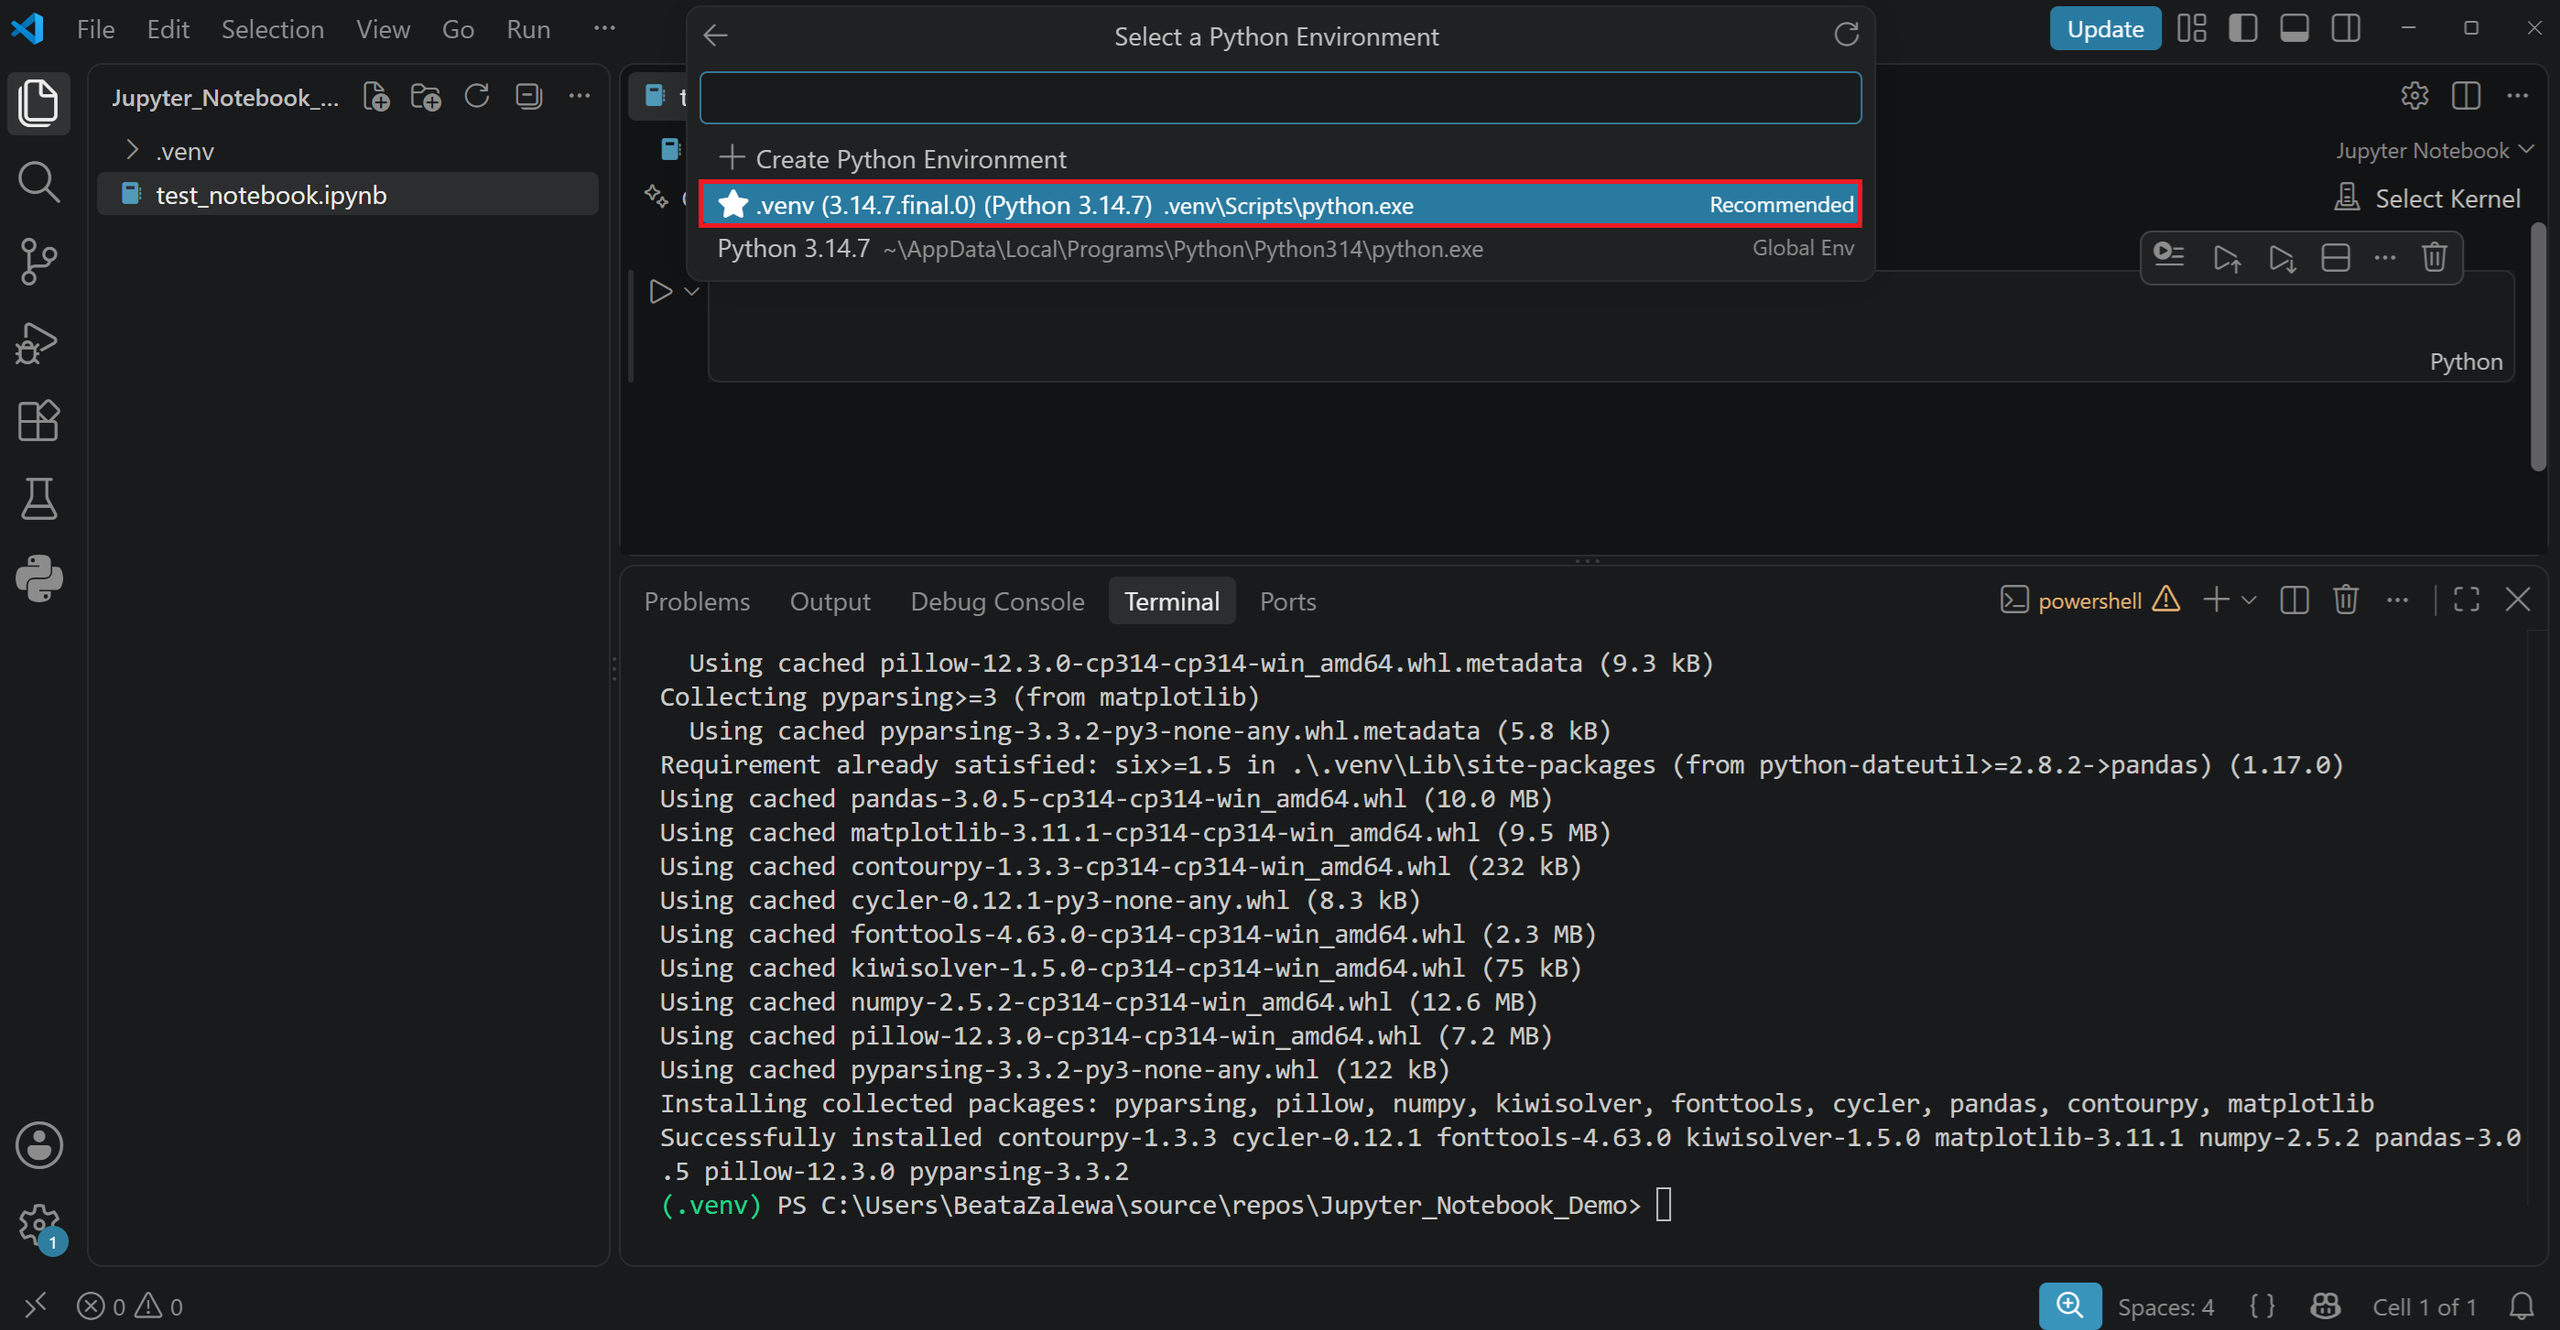
source .venv/bin/activateOnce the environment has been activated, (.venv) should appear at the beginning of the terminal prompt.
Step 4: Install the Jupyter packages
Run the following command in the active environment:
python -m pip install jupyter ipykernel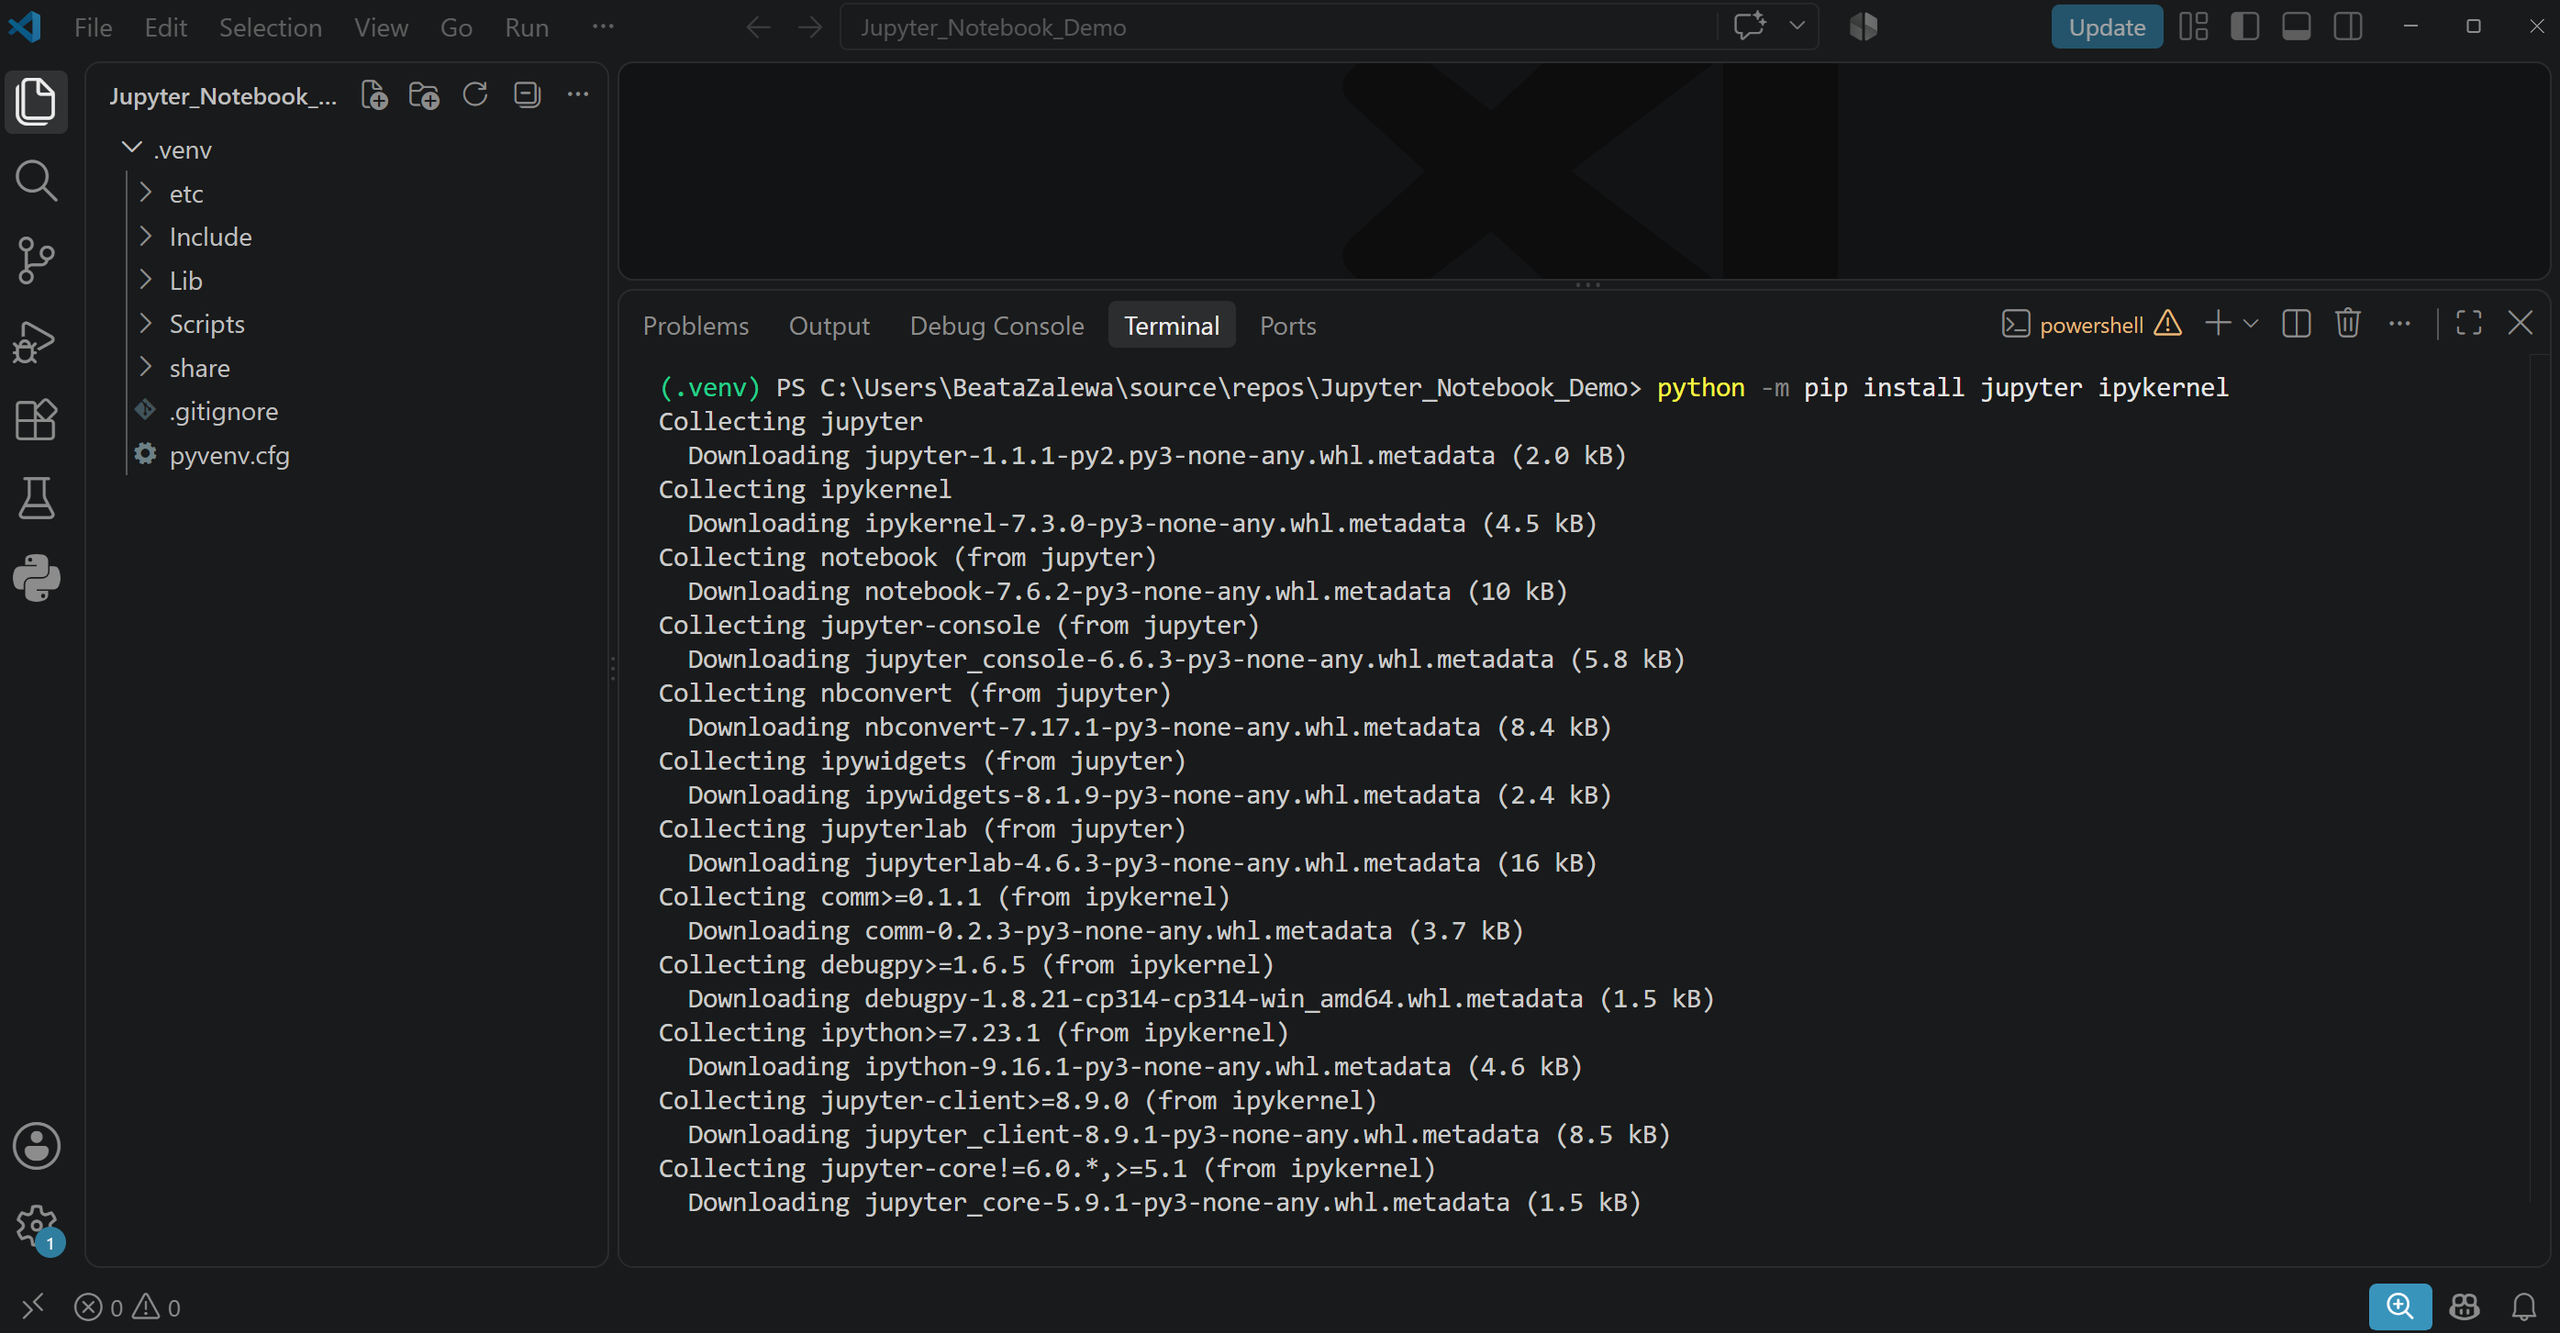
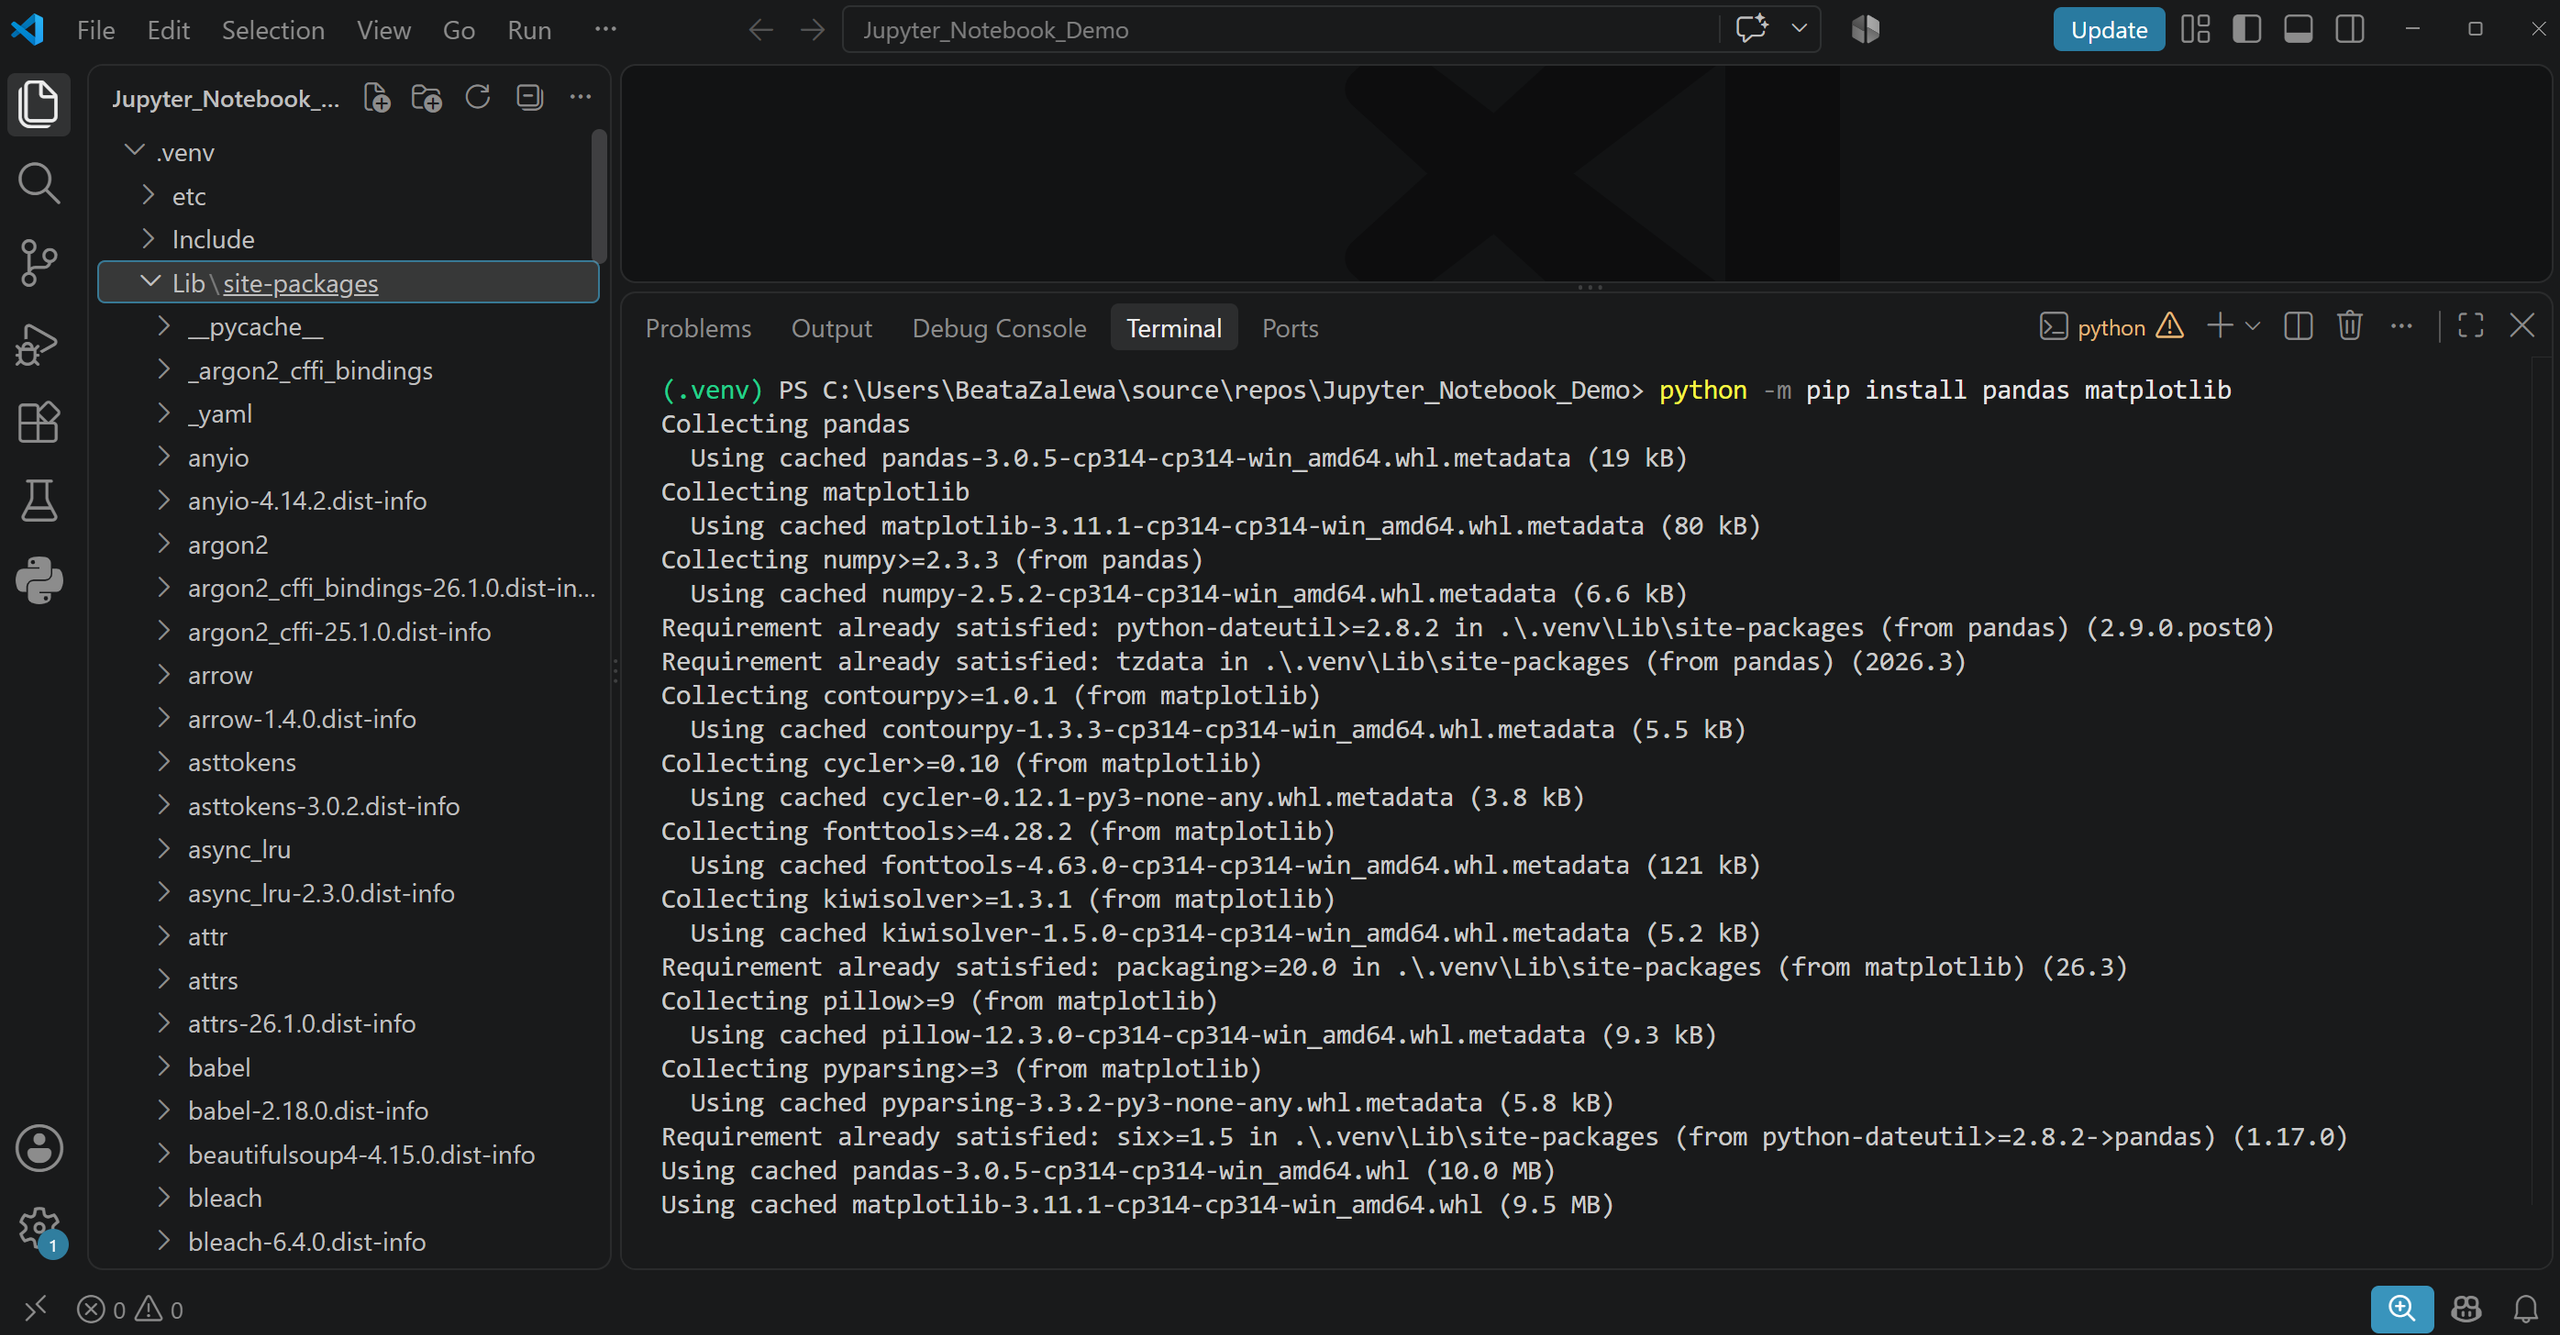
If you intend to analyse data, you can install some popular libraries at the same time:
python -m pip install pandas matplotlibUsing python -m pip reduces the risk of installing a package into a different Python installation from the one currently being used by your project.
How to create a new Jupyter Notebook in VS Code
You can create a new notebook in two straightforward ways.
The first method:
1. Open the Command Palette with Ctrl+Shift+P.
2. Enter Create: New Jupyter Notebook.
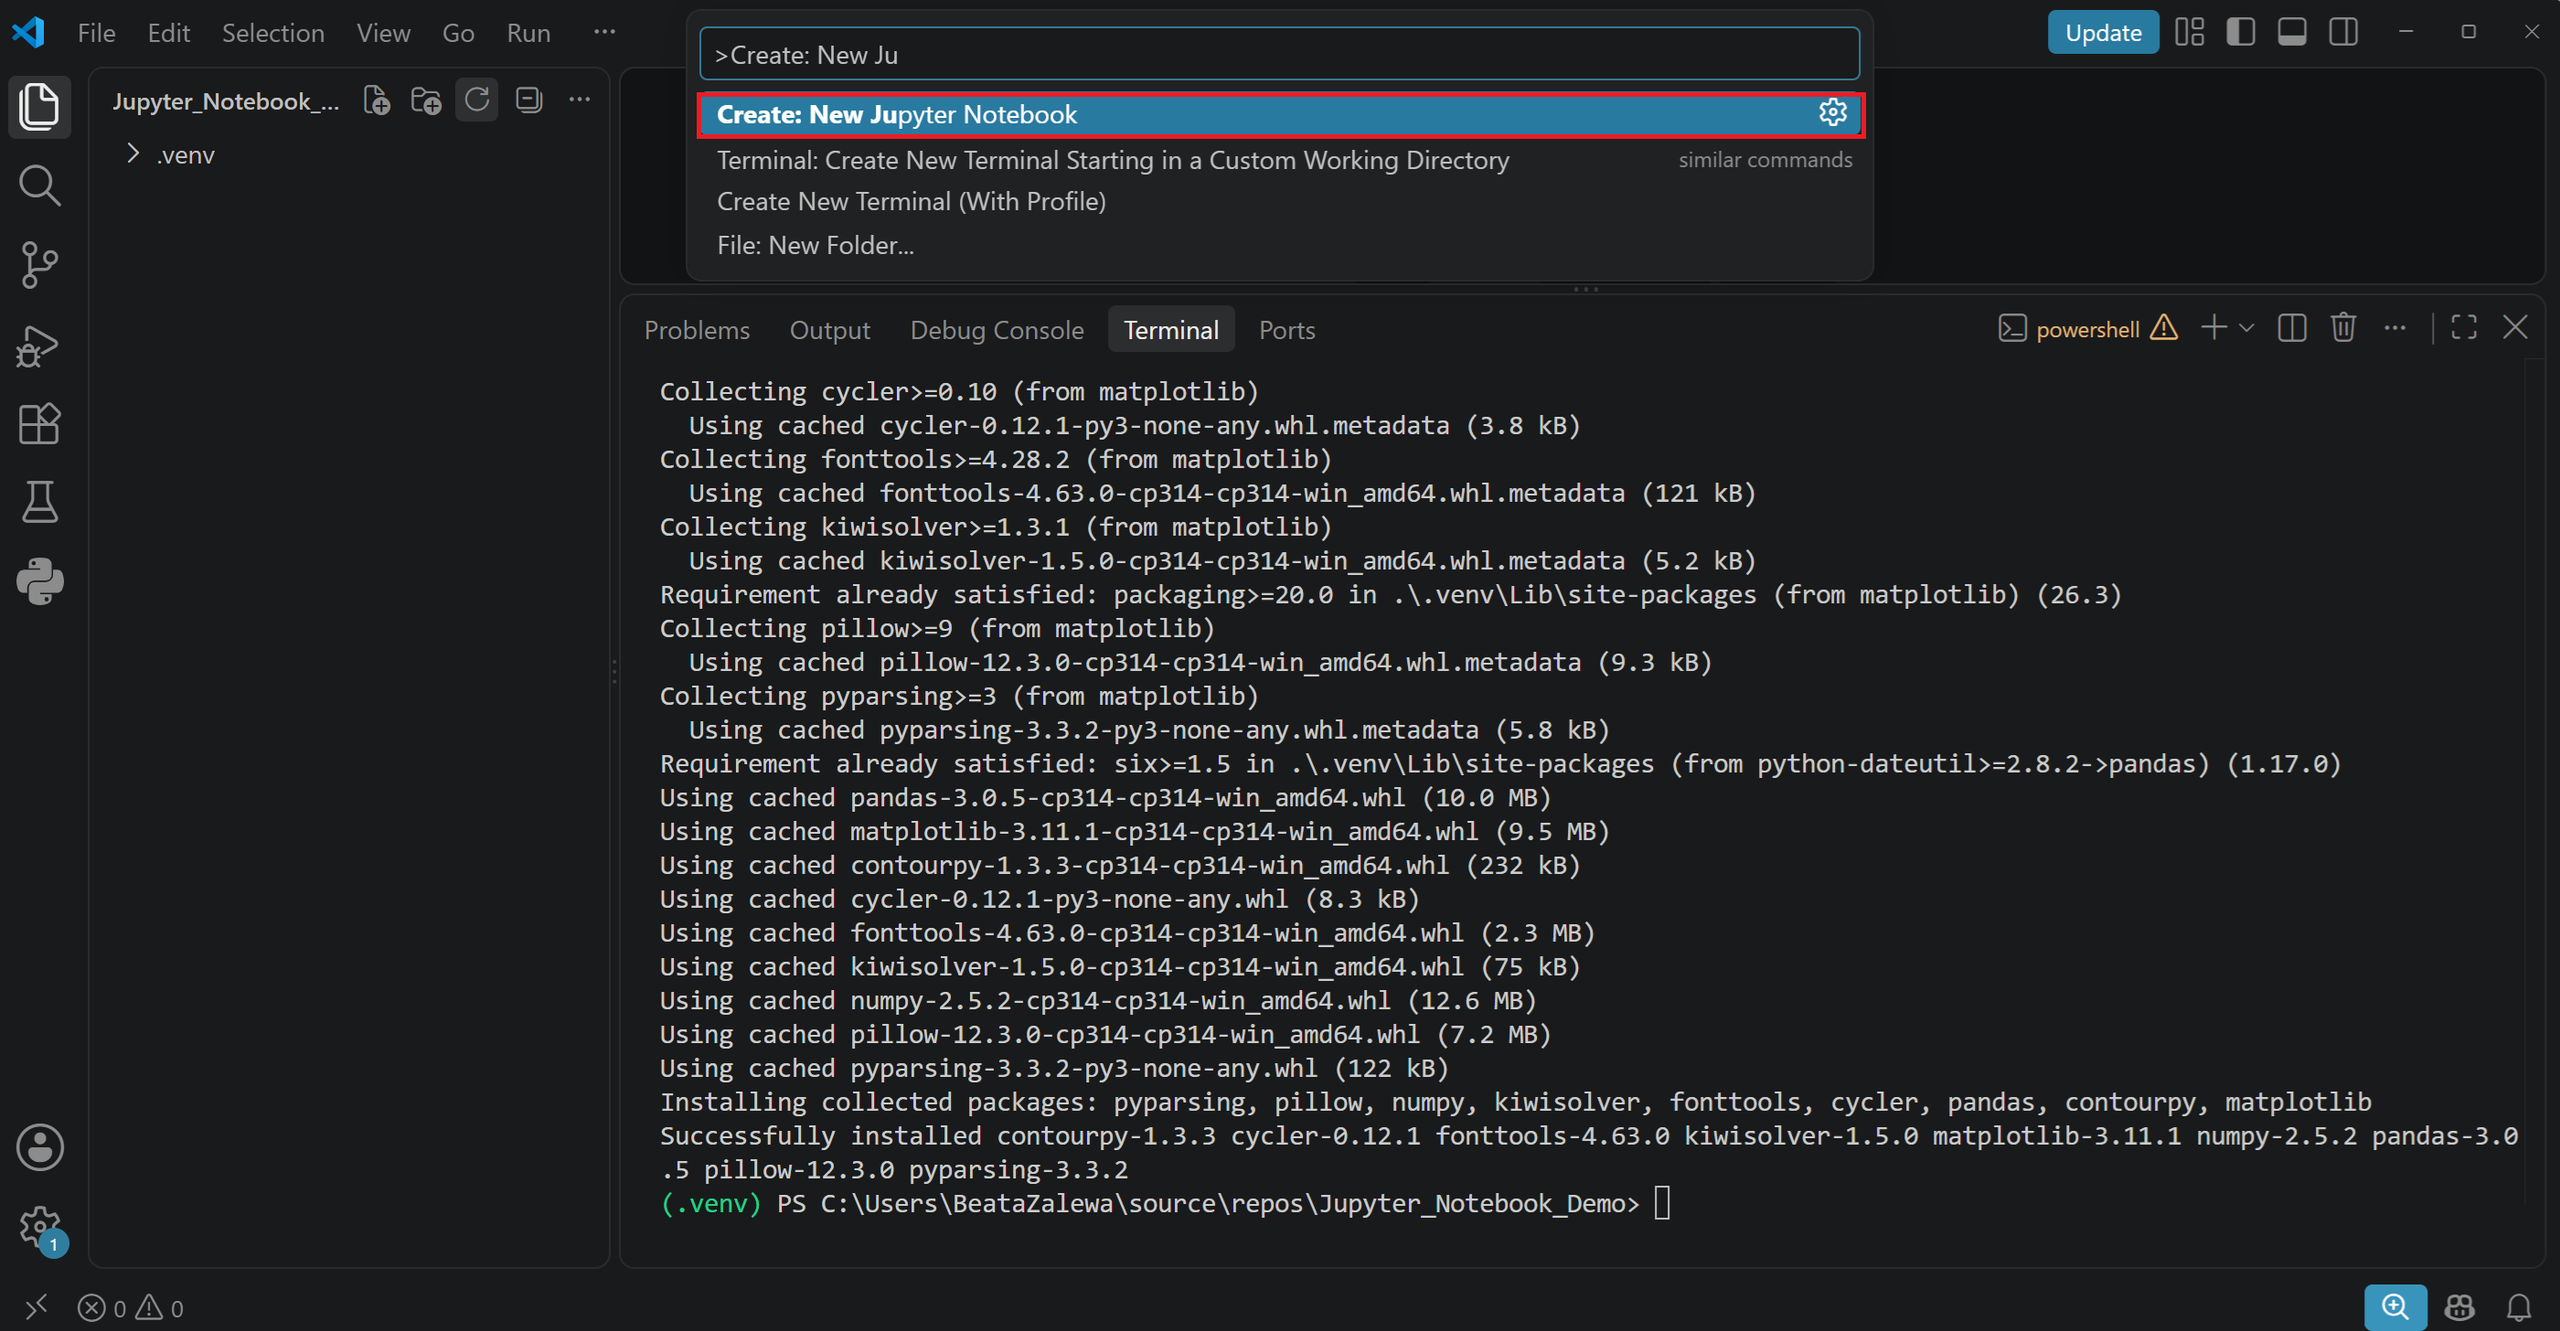
3. Select the command from the list.
4. Save the file with the .ipynb extension, for example, test_notebook.ipynb.
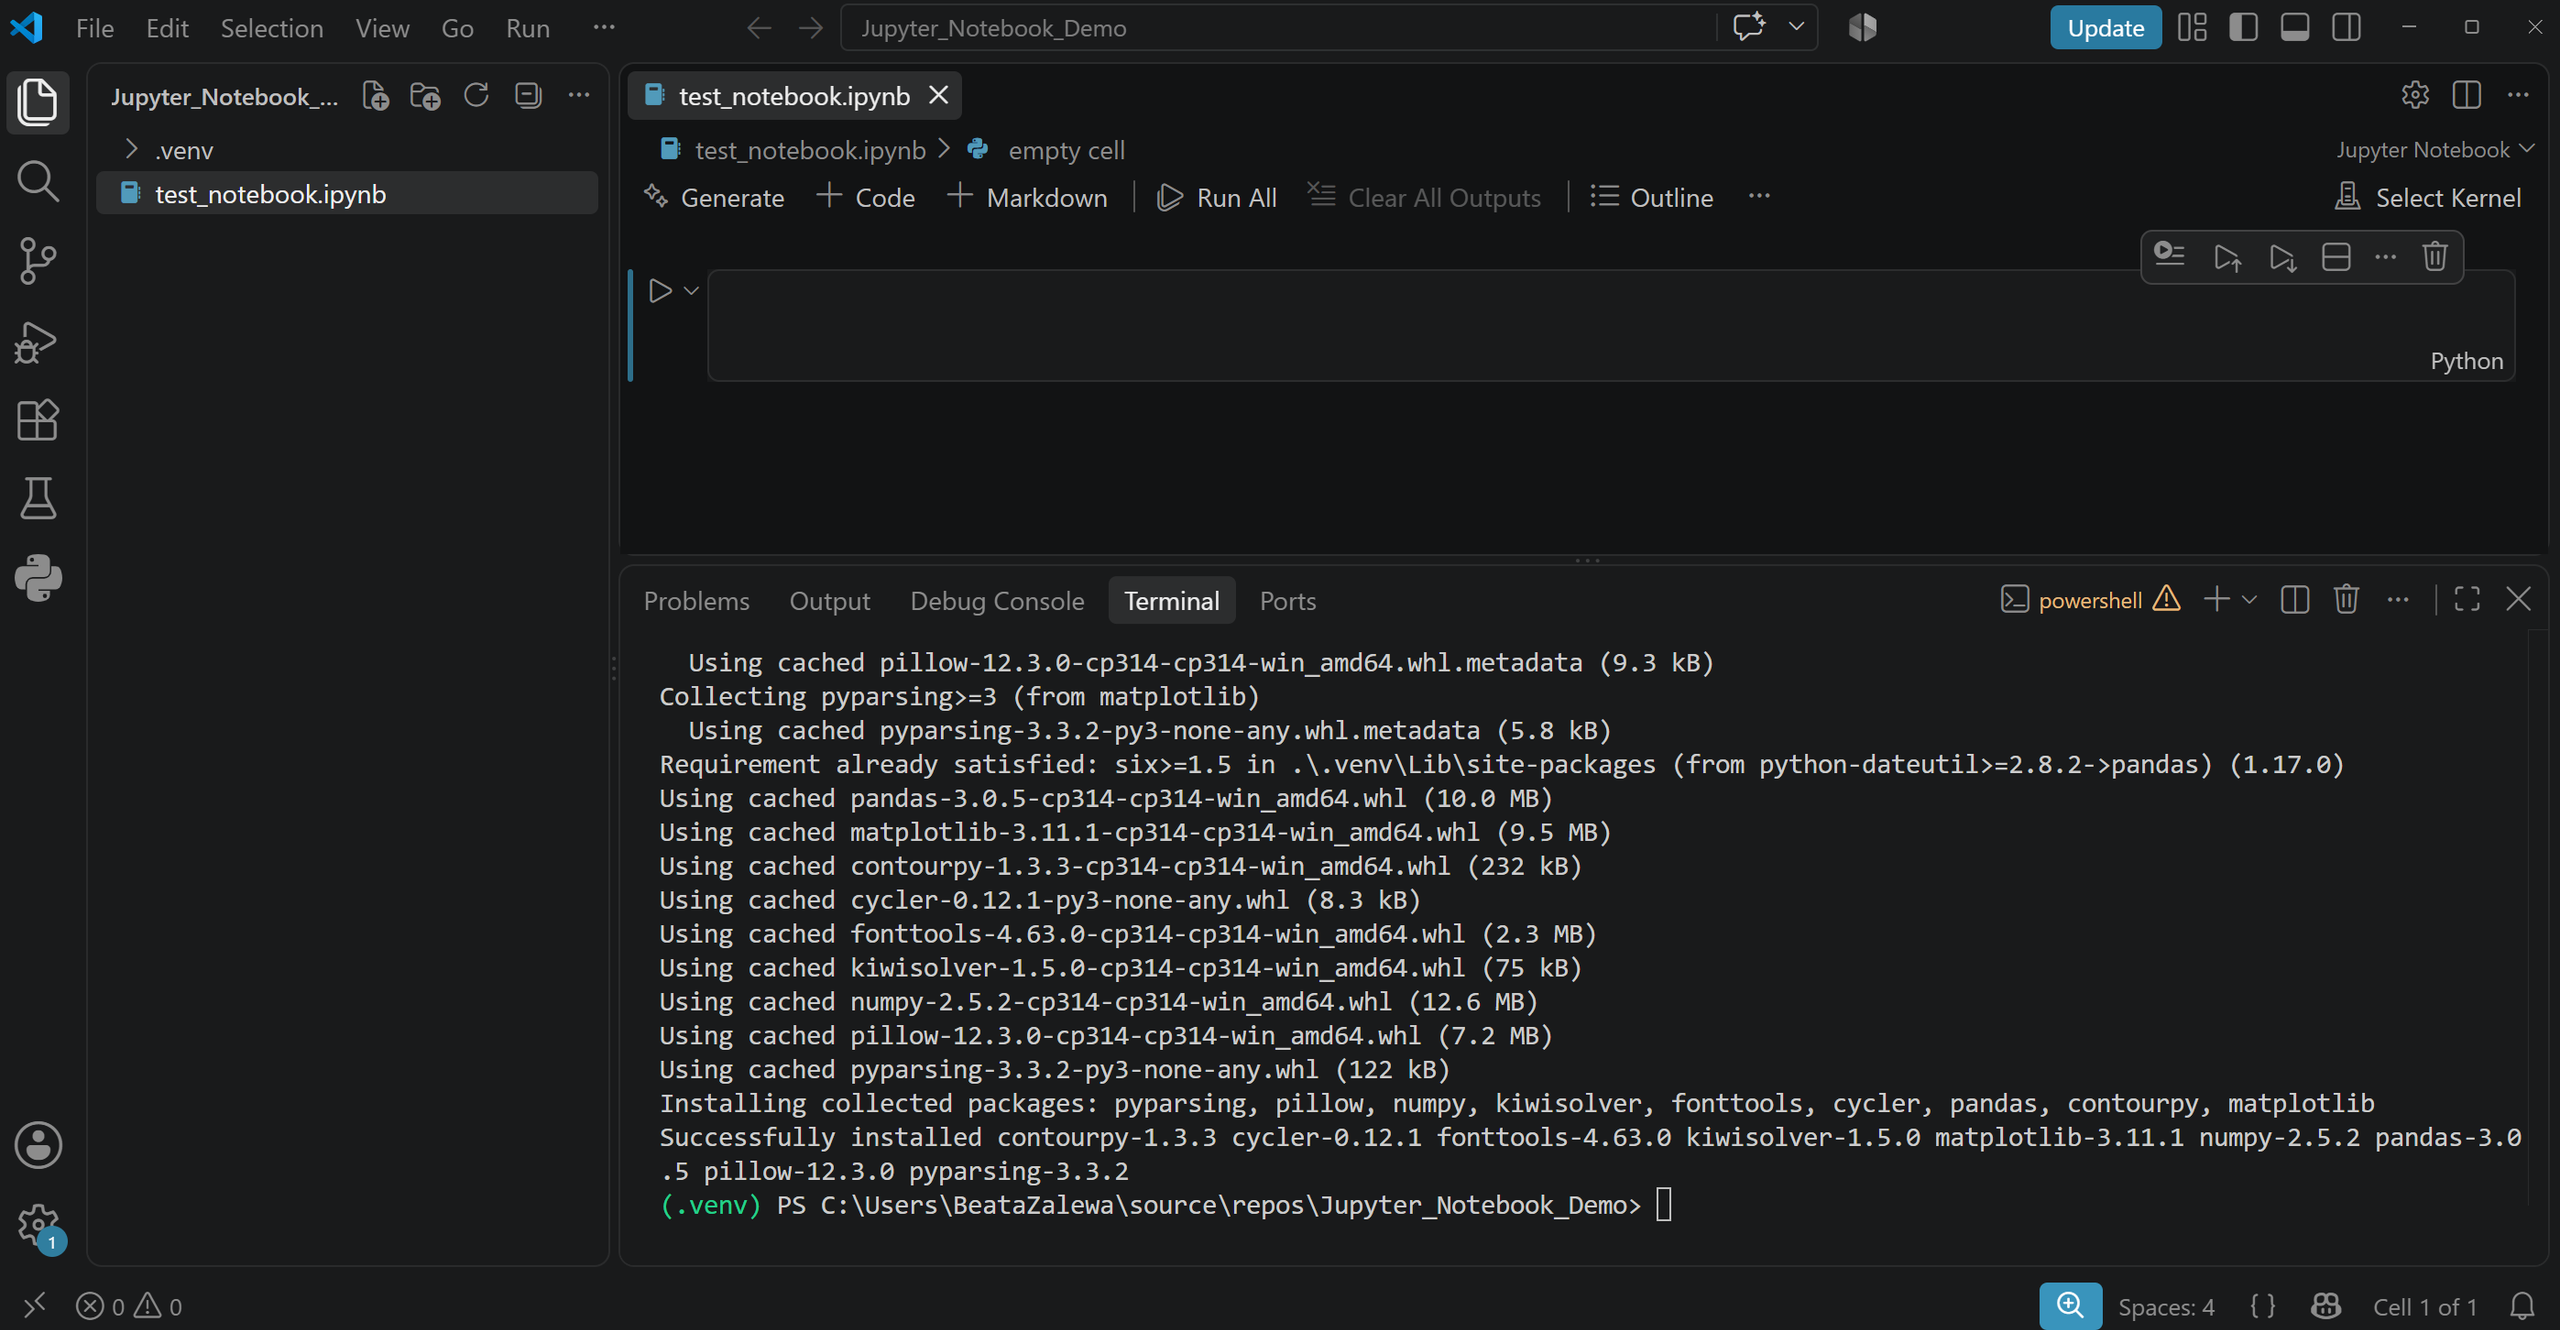
The second method is to create a new file directly in the Explorer panel. Simply give it a name ending with the .ipynb extension. Visual Studio Code will automatically open it in the notebook editor.
How to open an existing .ipynb file
If you already have a notebook file, select File → Open File and choose the relevant .ipynb file. Alternatively, you can open the entire project folder and then select the notebook from the Explorer panel.
The file should be displayed as a collection of cells. If you see raw JSON instead, right-click the file tab, select Reopen Editor With, and then choose the Jupyter Notebook editor.
How to select a kernel in Jupyter Notebook in VS Code
A kernel is the process responsible for executing the code contained in notebook cells. You can think of it as an engine: the notebook stores the instructions and results, whilst the kernel actually runs the program.
After opening the notebook, select Select Kernel in the upper-right corner.
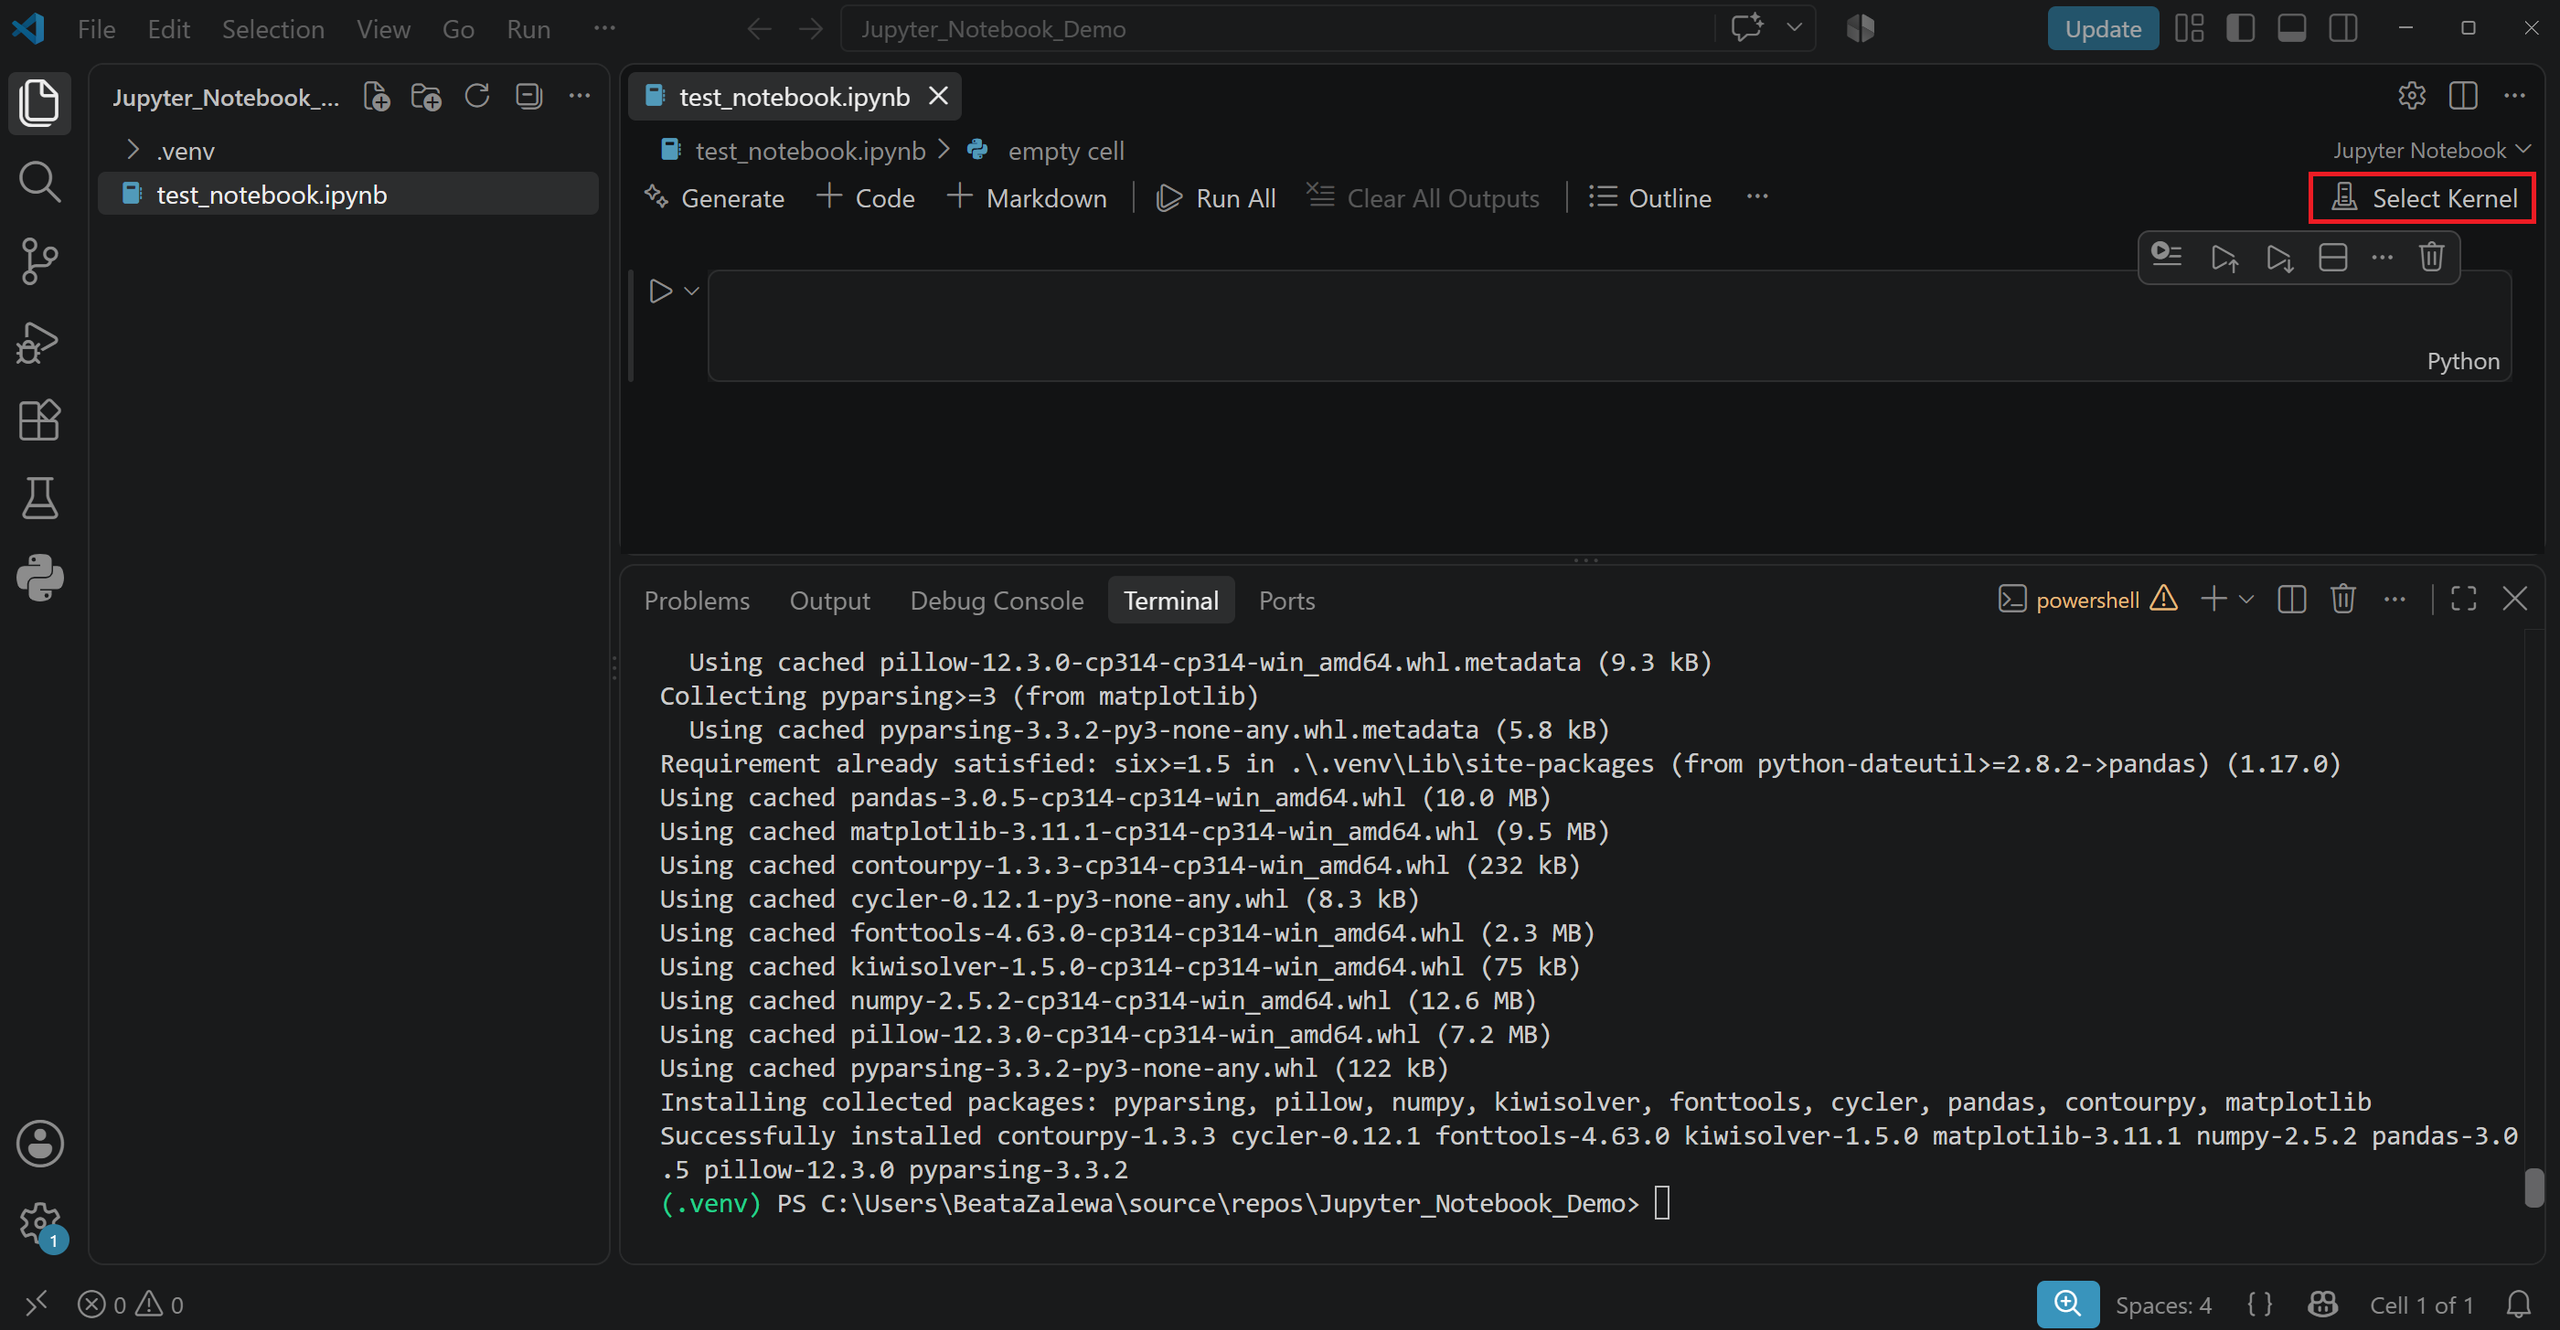
Next, select Python Virtual Environments… .
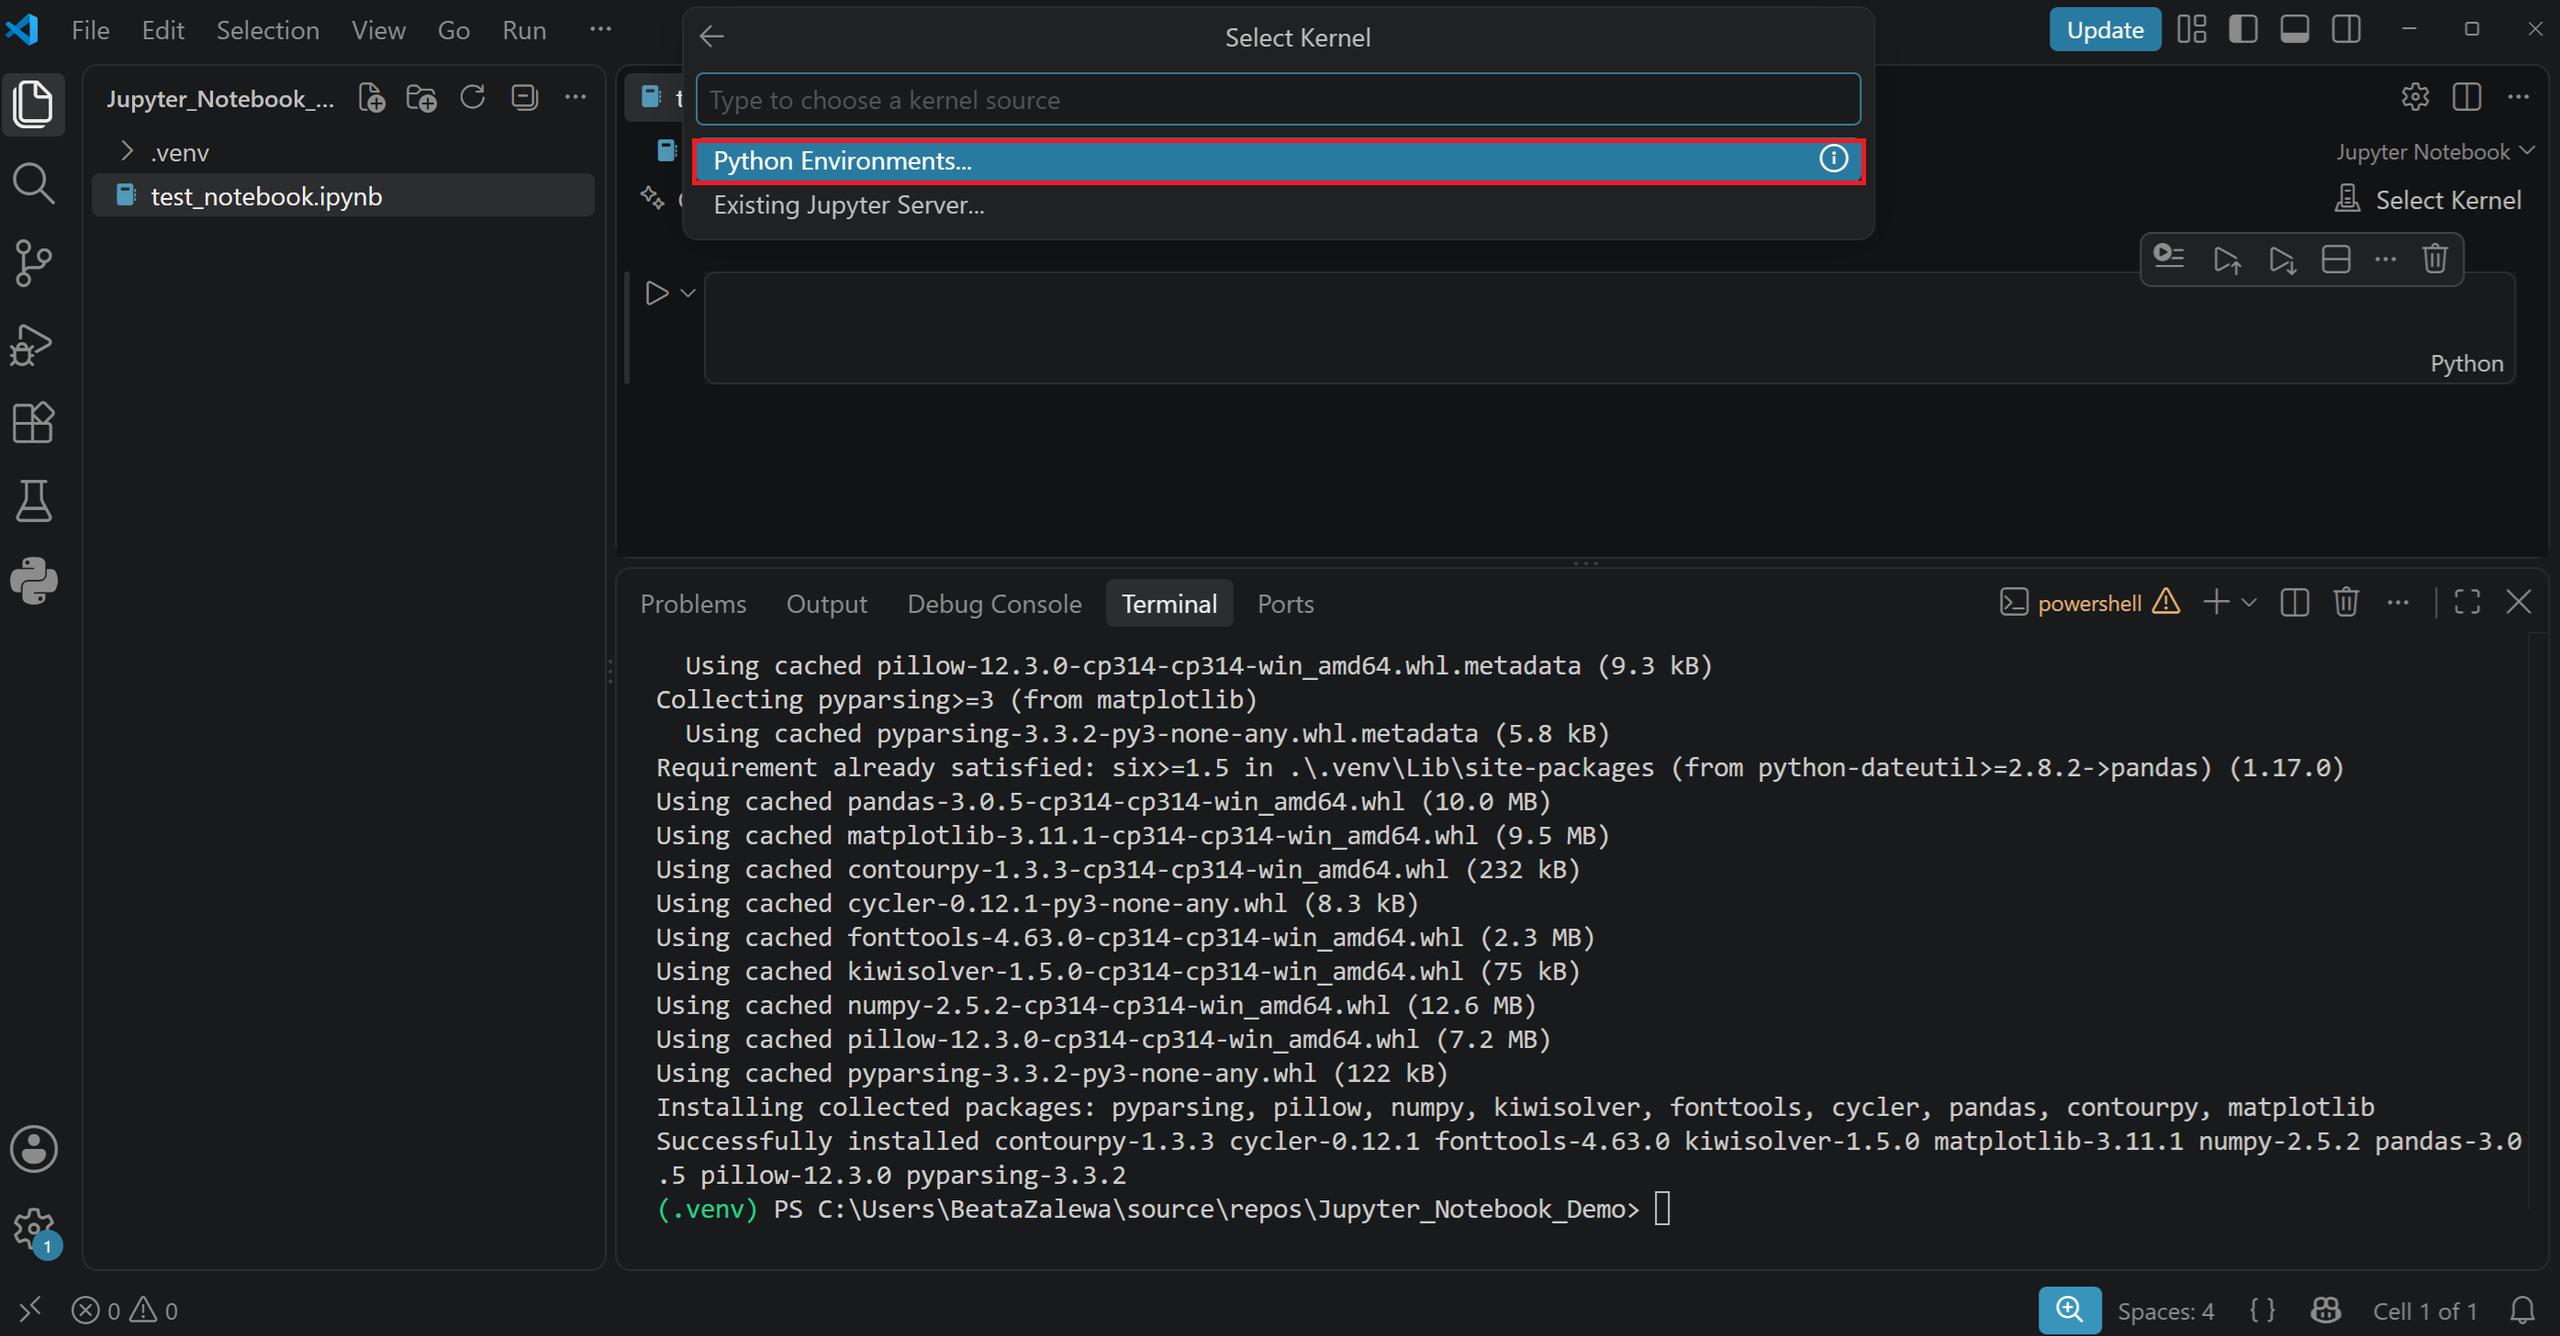
Choose the environment created in the .venv folder.
Wait until the name of the selected kernel appears in the upper-right corner.
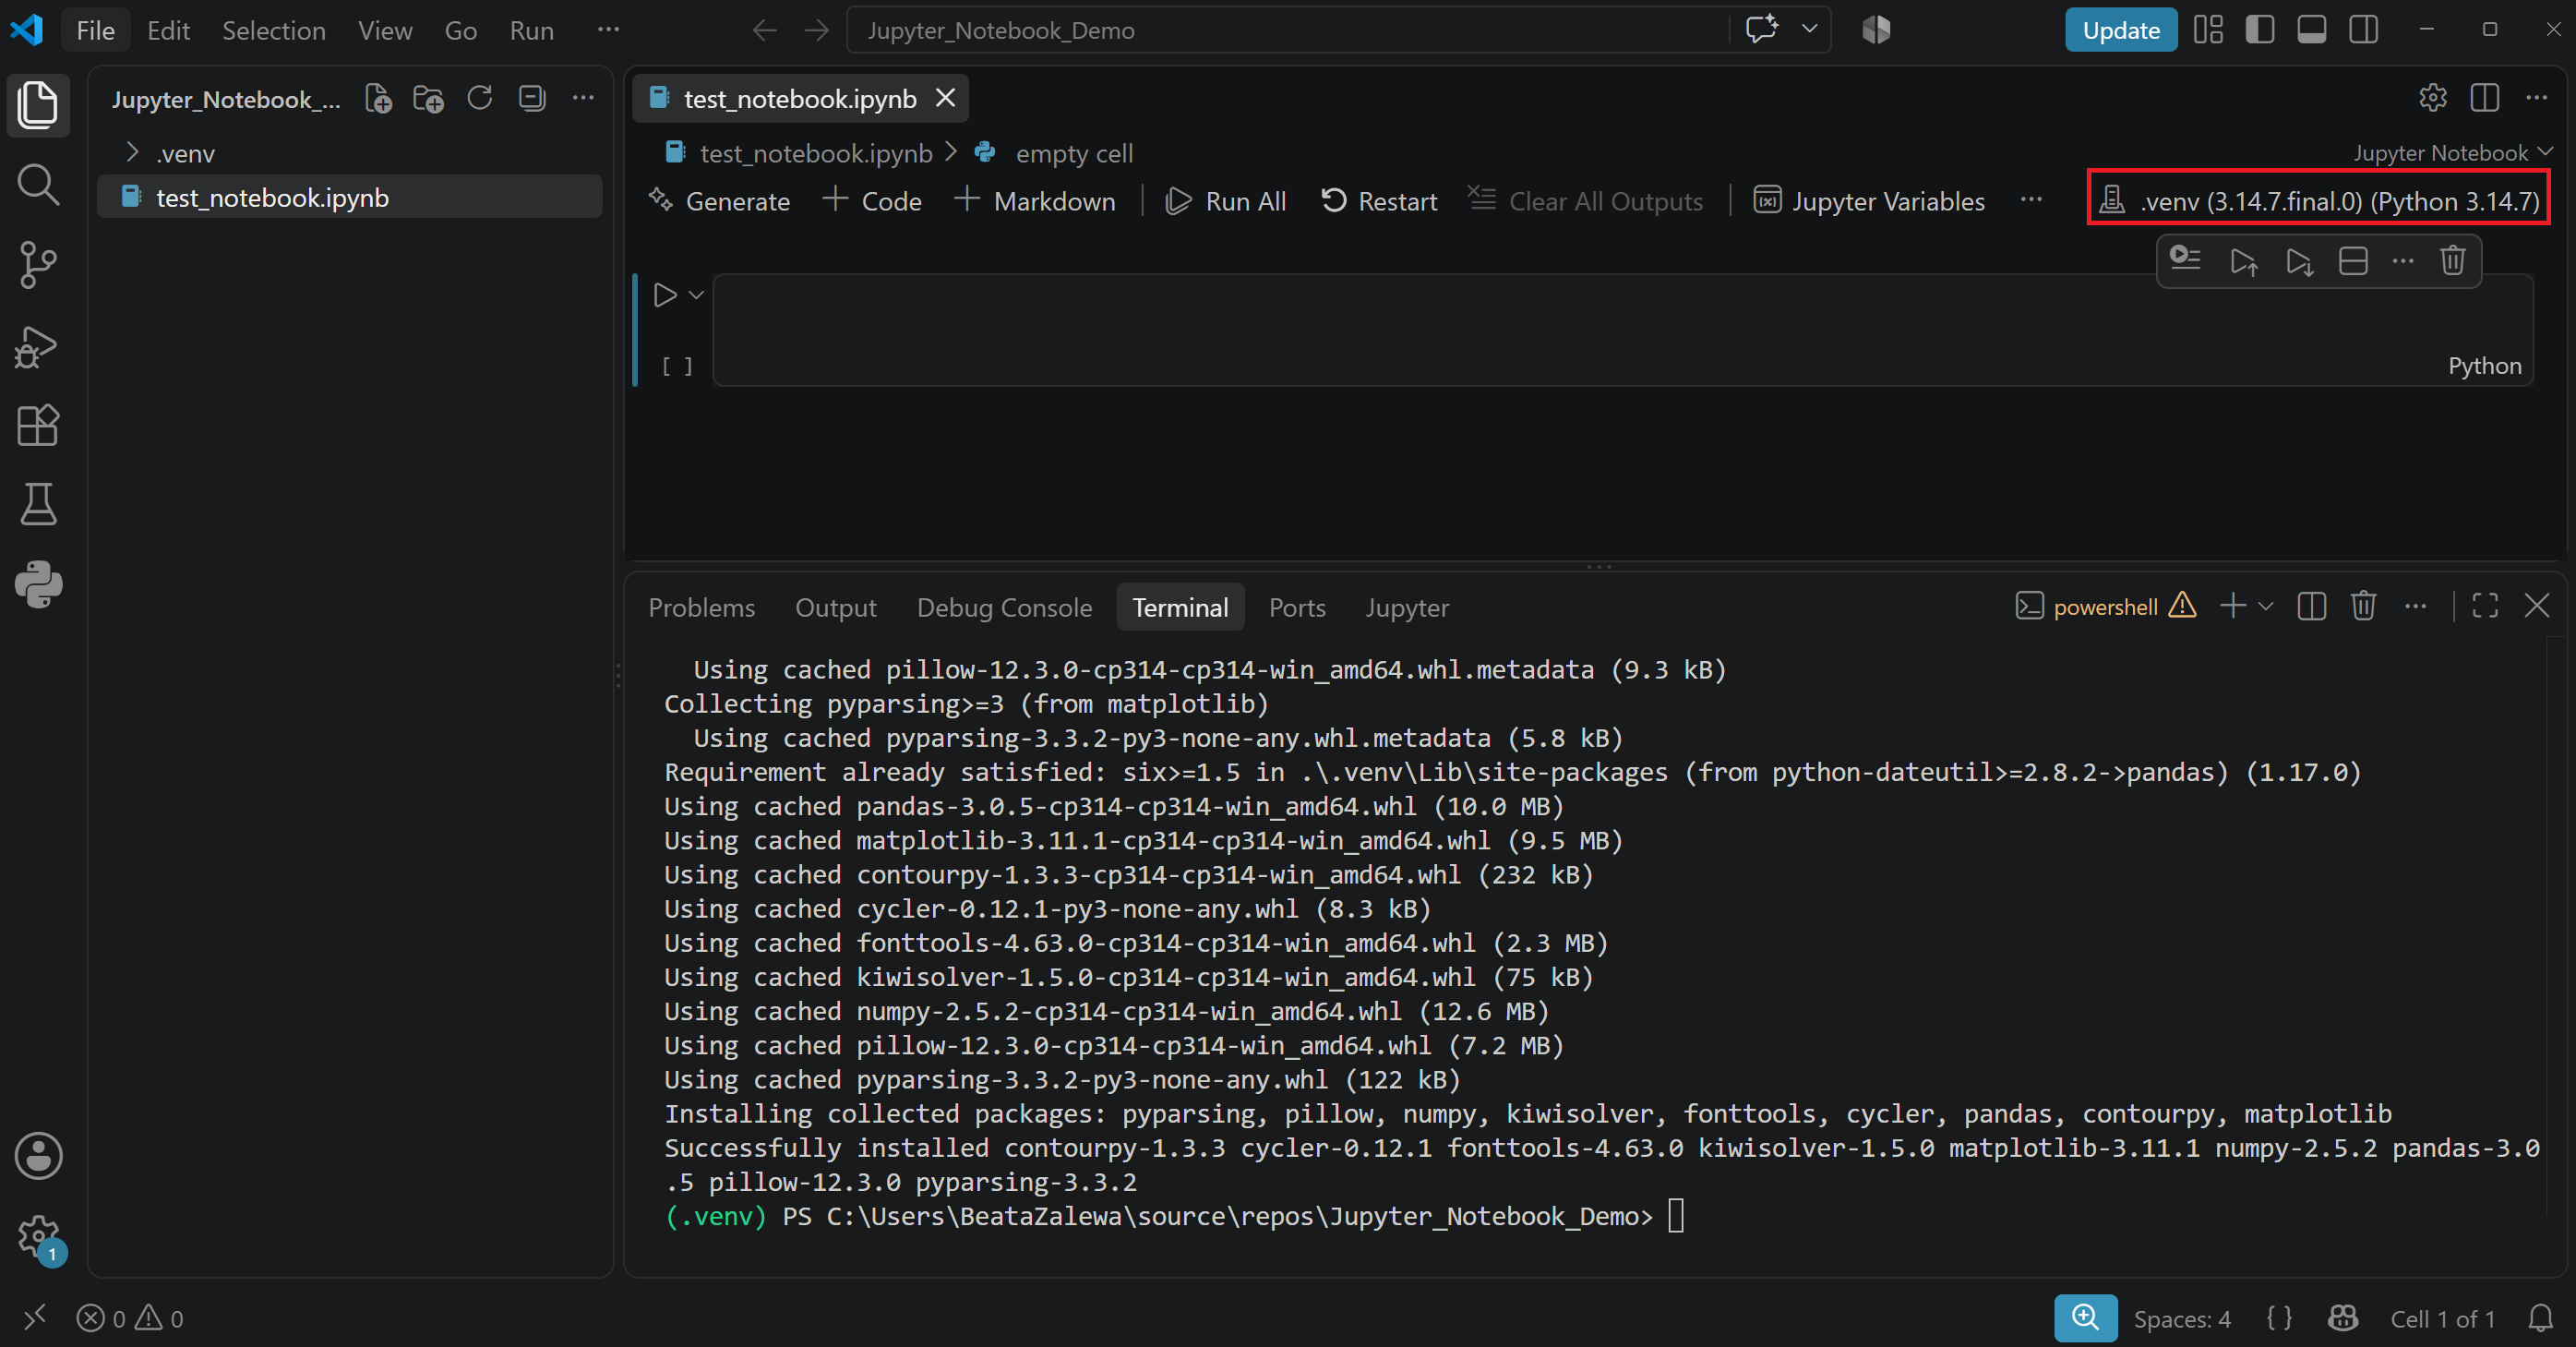
This step is important. If the Pandas library has been installed in .venv, but the notebook is using the global Python installation, an import may fail with a ModuleNotFoundError.
Your first code in Jupyter Notebook in VS Code
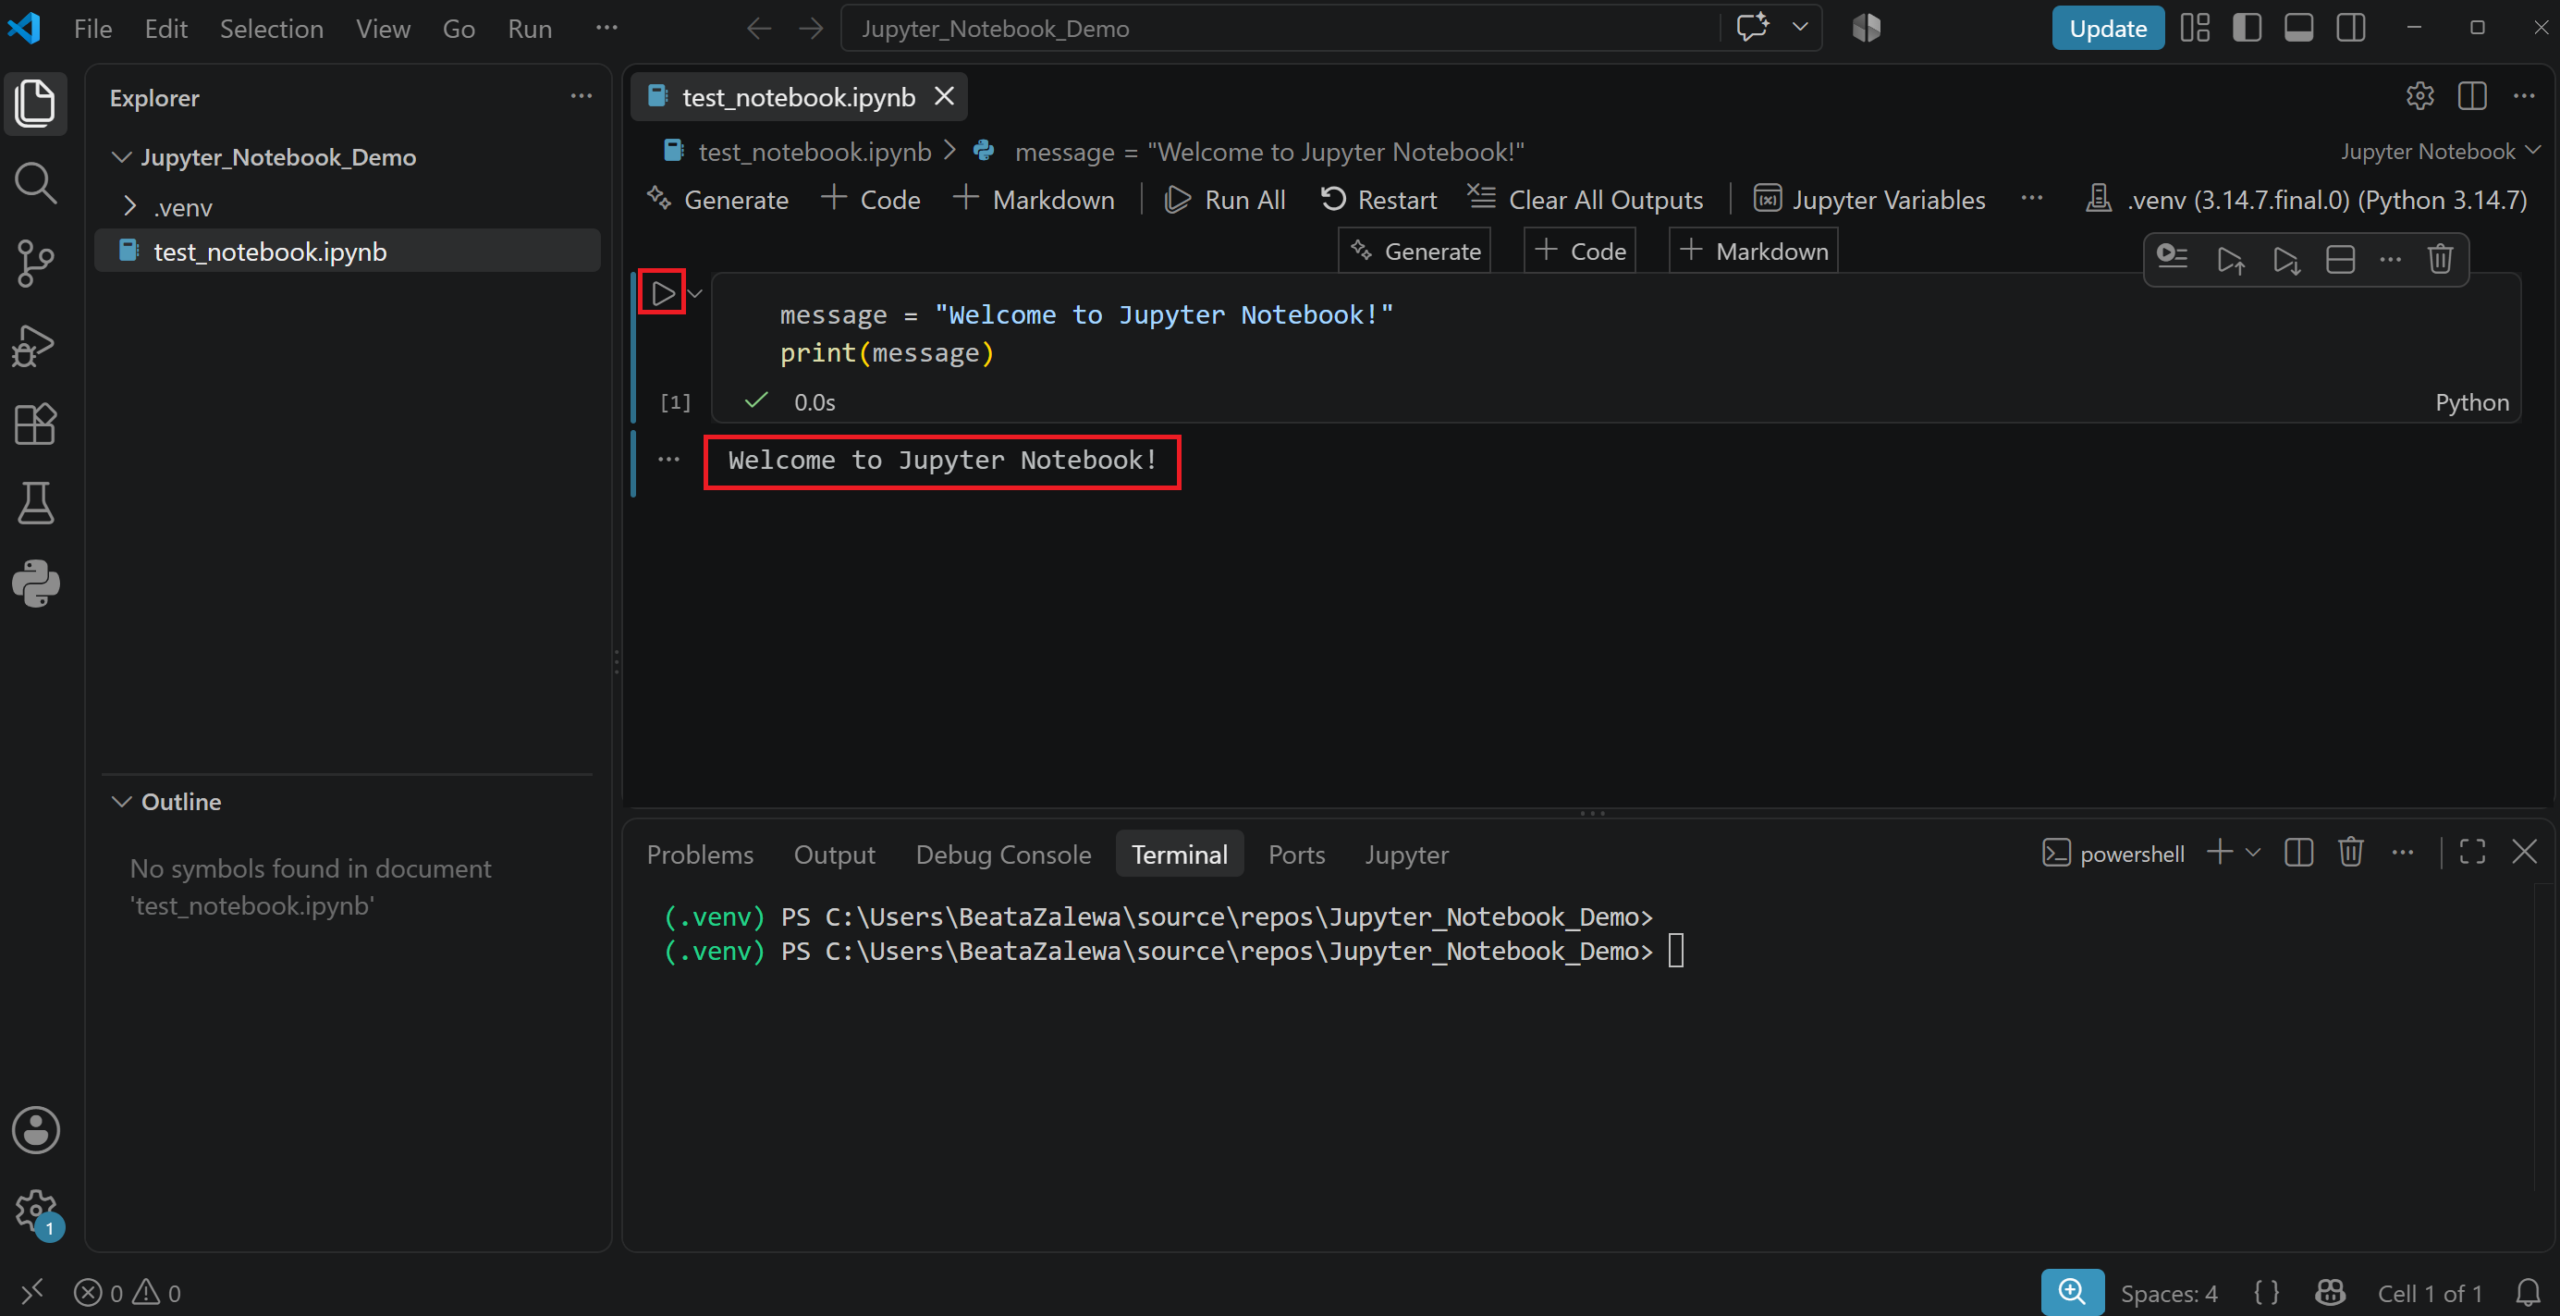
Select + Code, enter the following code and save your changes:
message = "Welcome to Jupyter Notebook!"
print(message)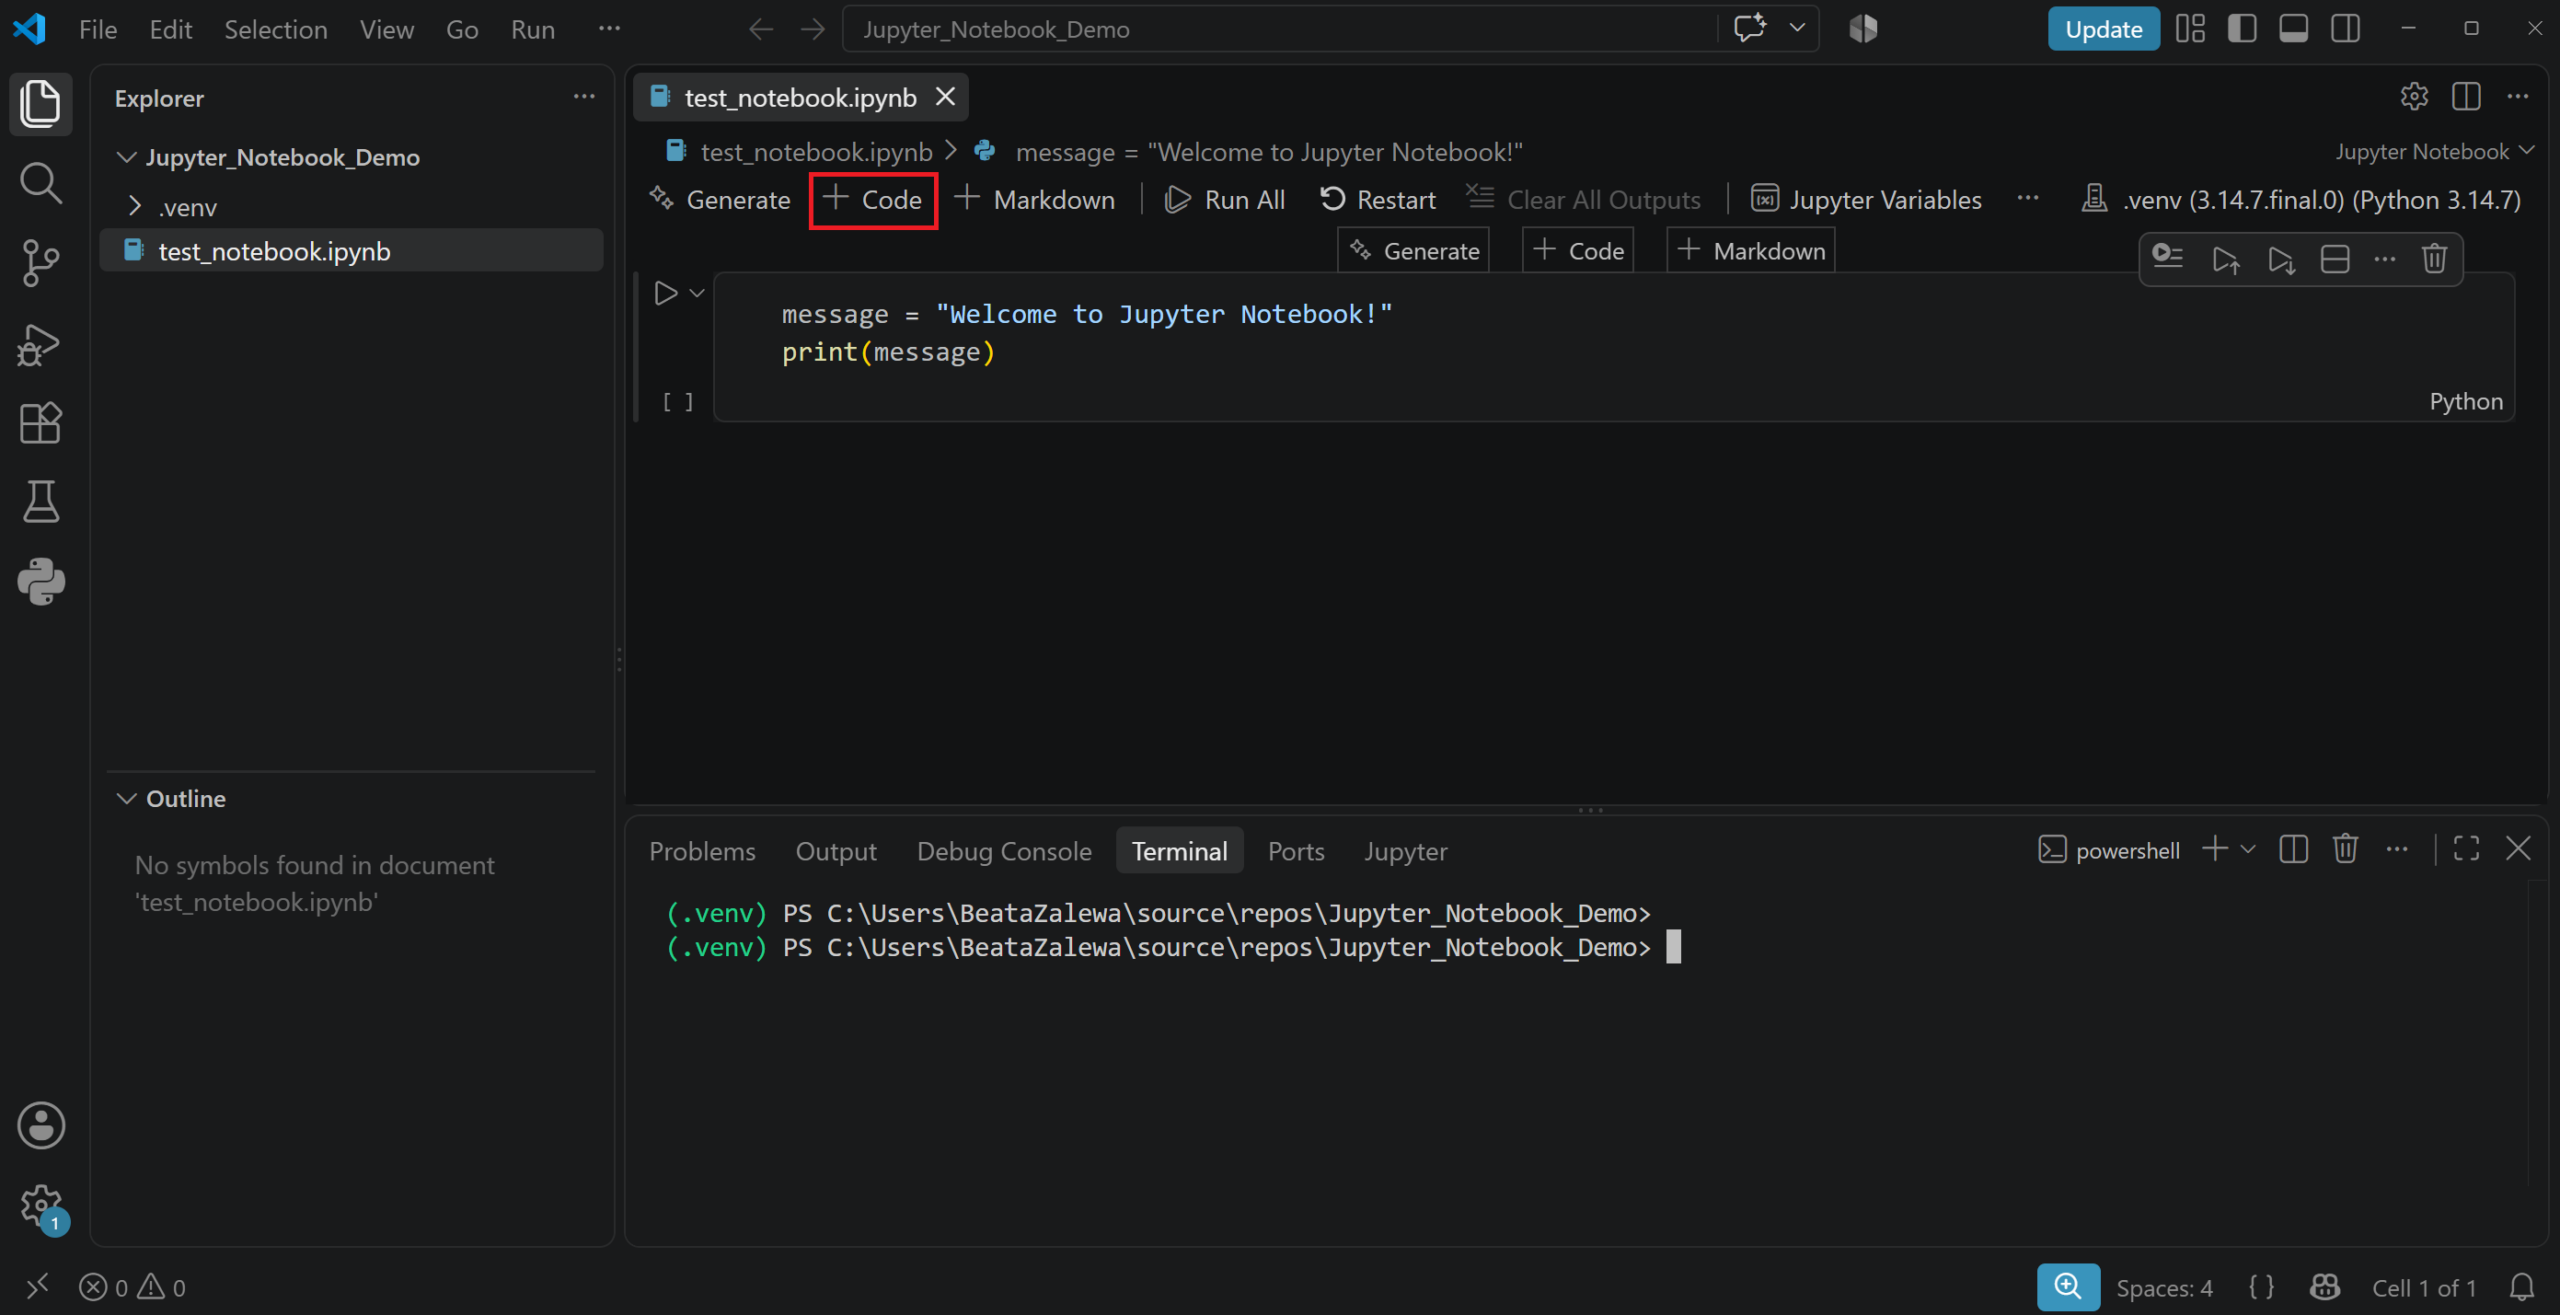
Run the cell by selecting the triangular button on its left-hand side. You can also use the following keyboard shortcuts:
- Ctrl+Enter – runs the current cell;
- Shift+Enter – runs the current cell and moves to the next one;
- Alt+Enter – runs the current cell and adds a new cell below it.
The result will appear directly beneath the code.
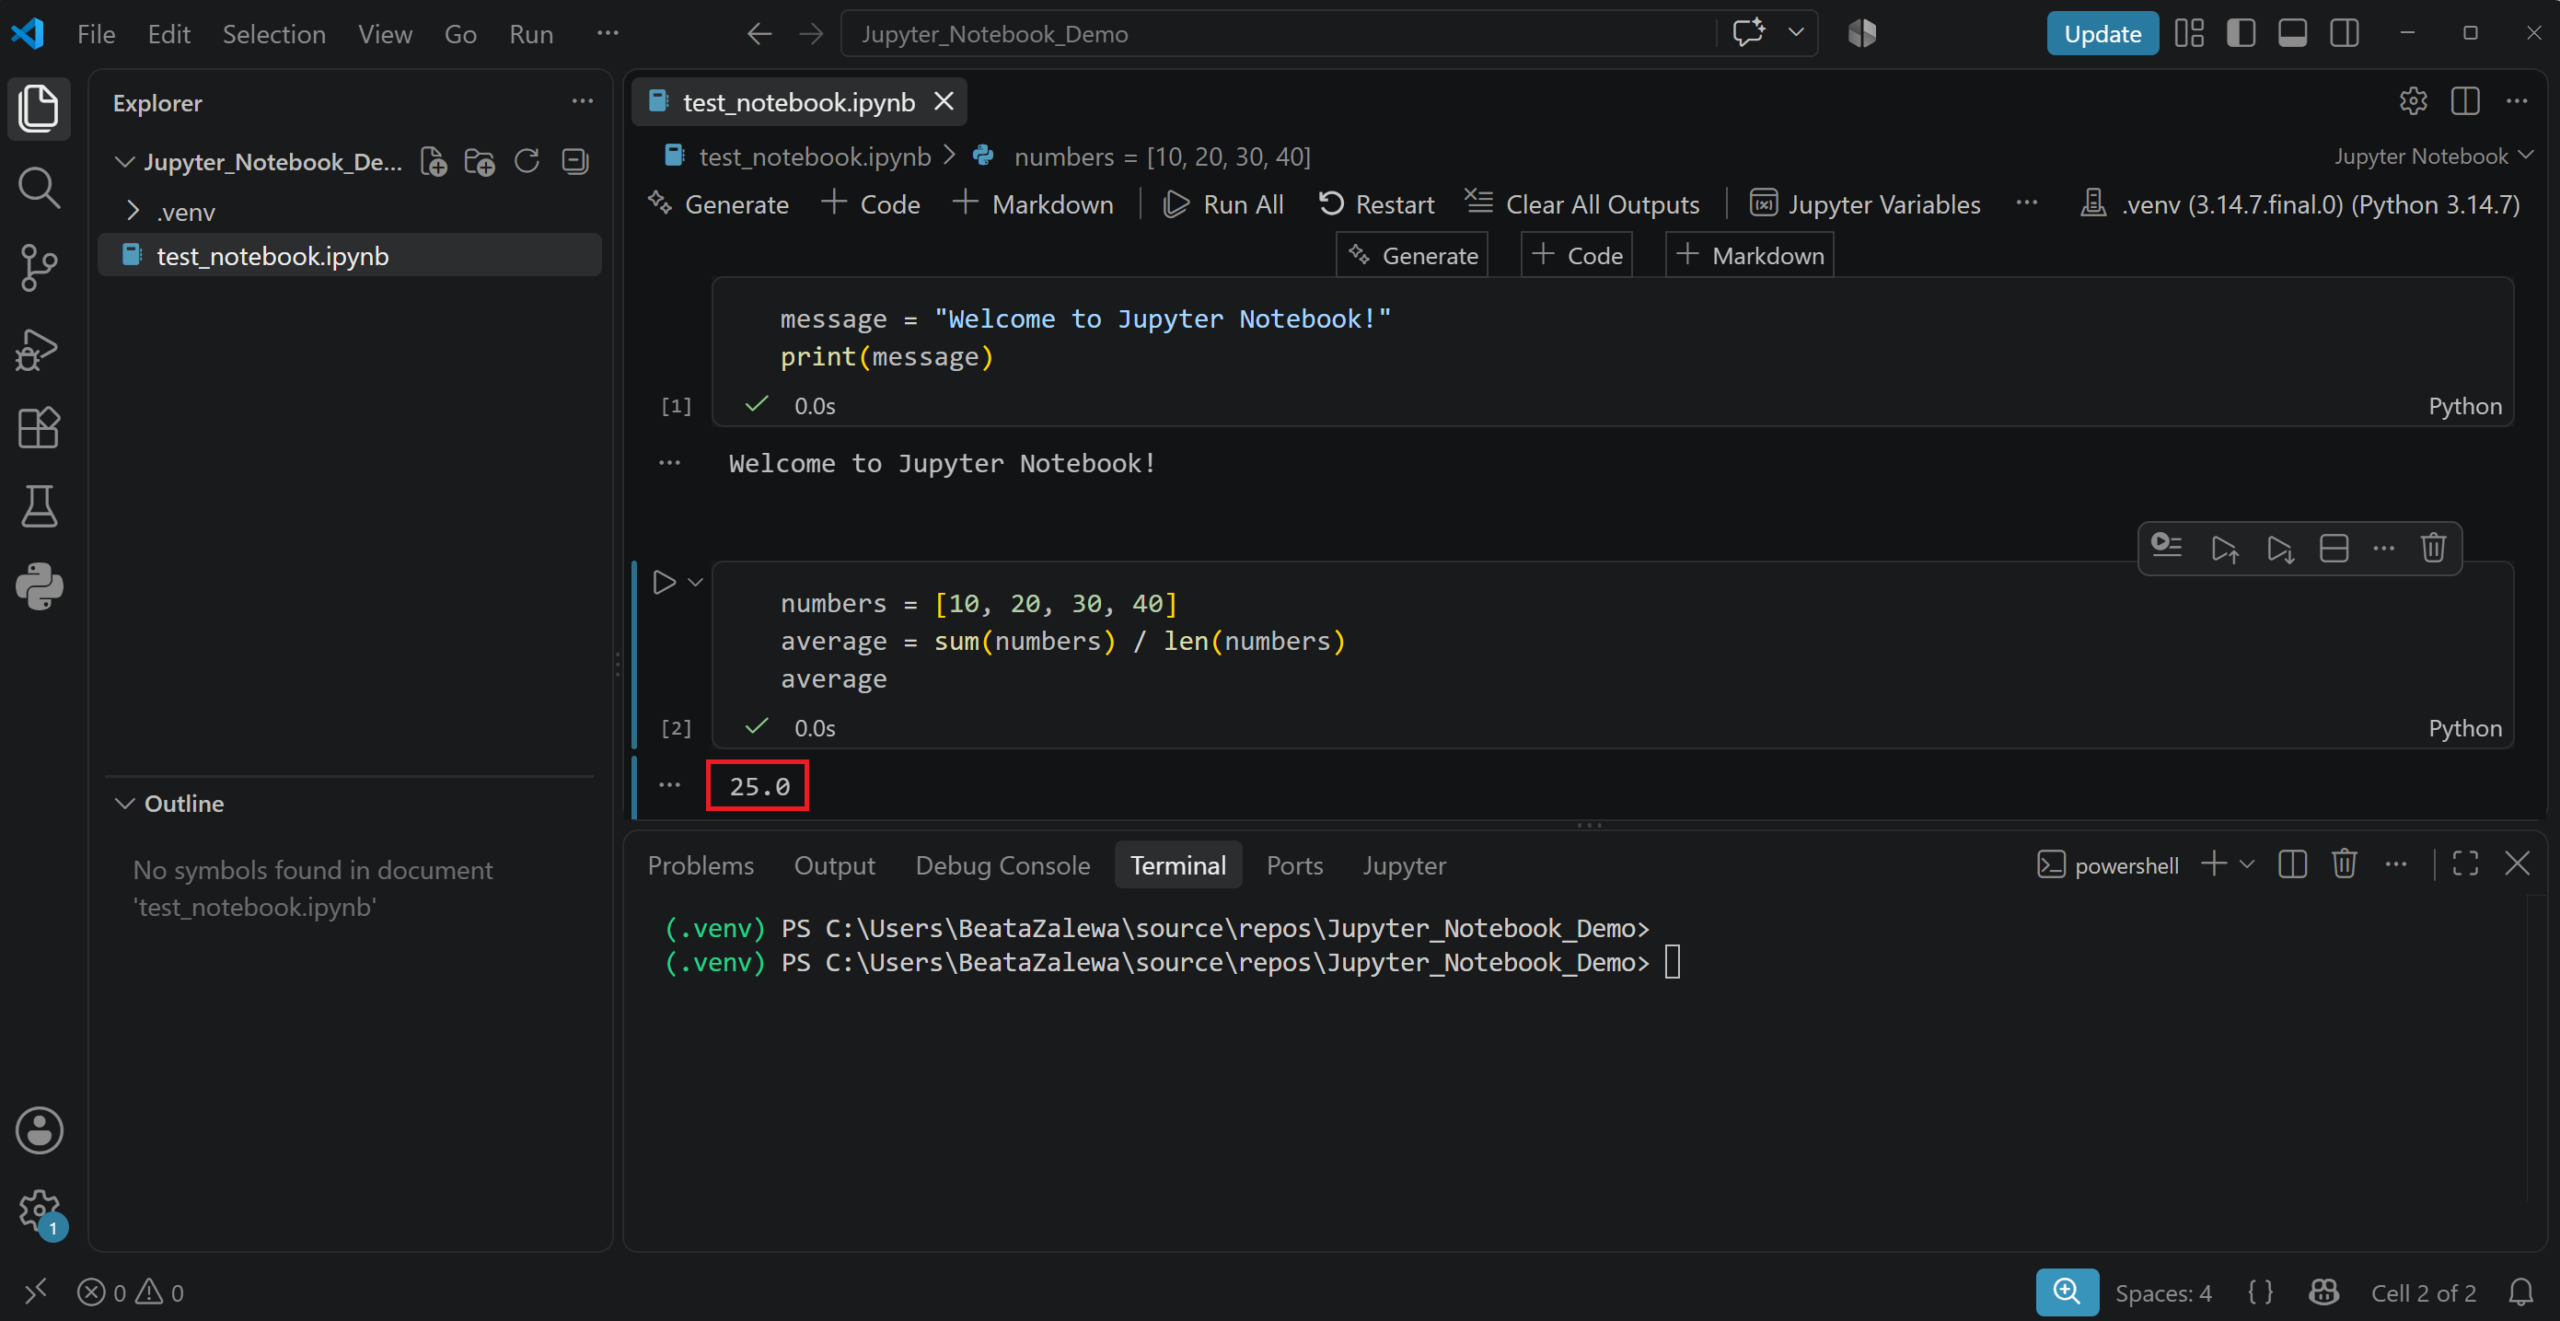
Next, add a second cell:
numbers = [10, 20, 30, 40]
average = sum(numbers) / len(numbers)
average
In a notebook, you do not always need to use the print() function. The value of the final expression in a cell is displayed automatically as its output.
How to add an explanation using a Markdown cell
A well-structured notebook should not contain code alone. Explanations help readers understand the purpose of the analysis, its underlying assumptions and the results obtained.
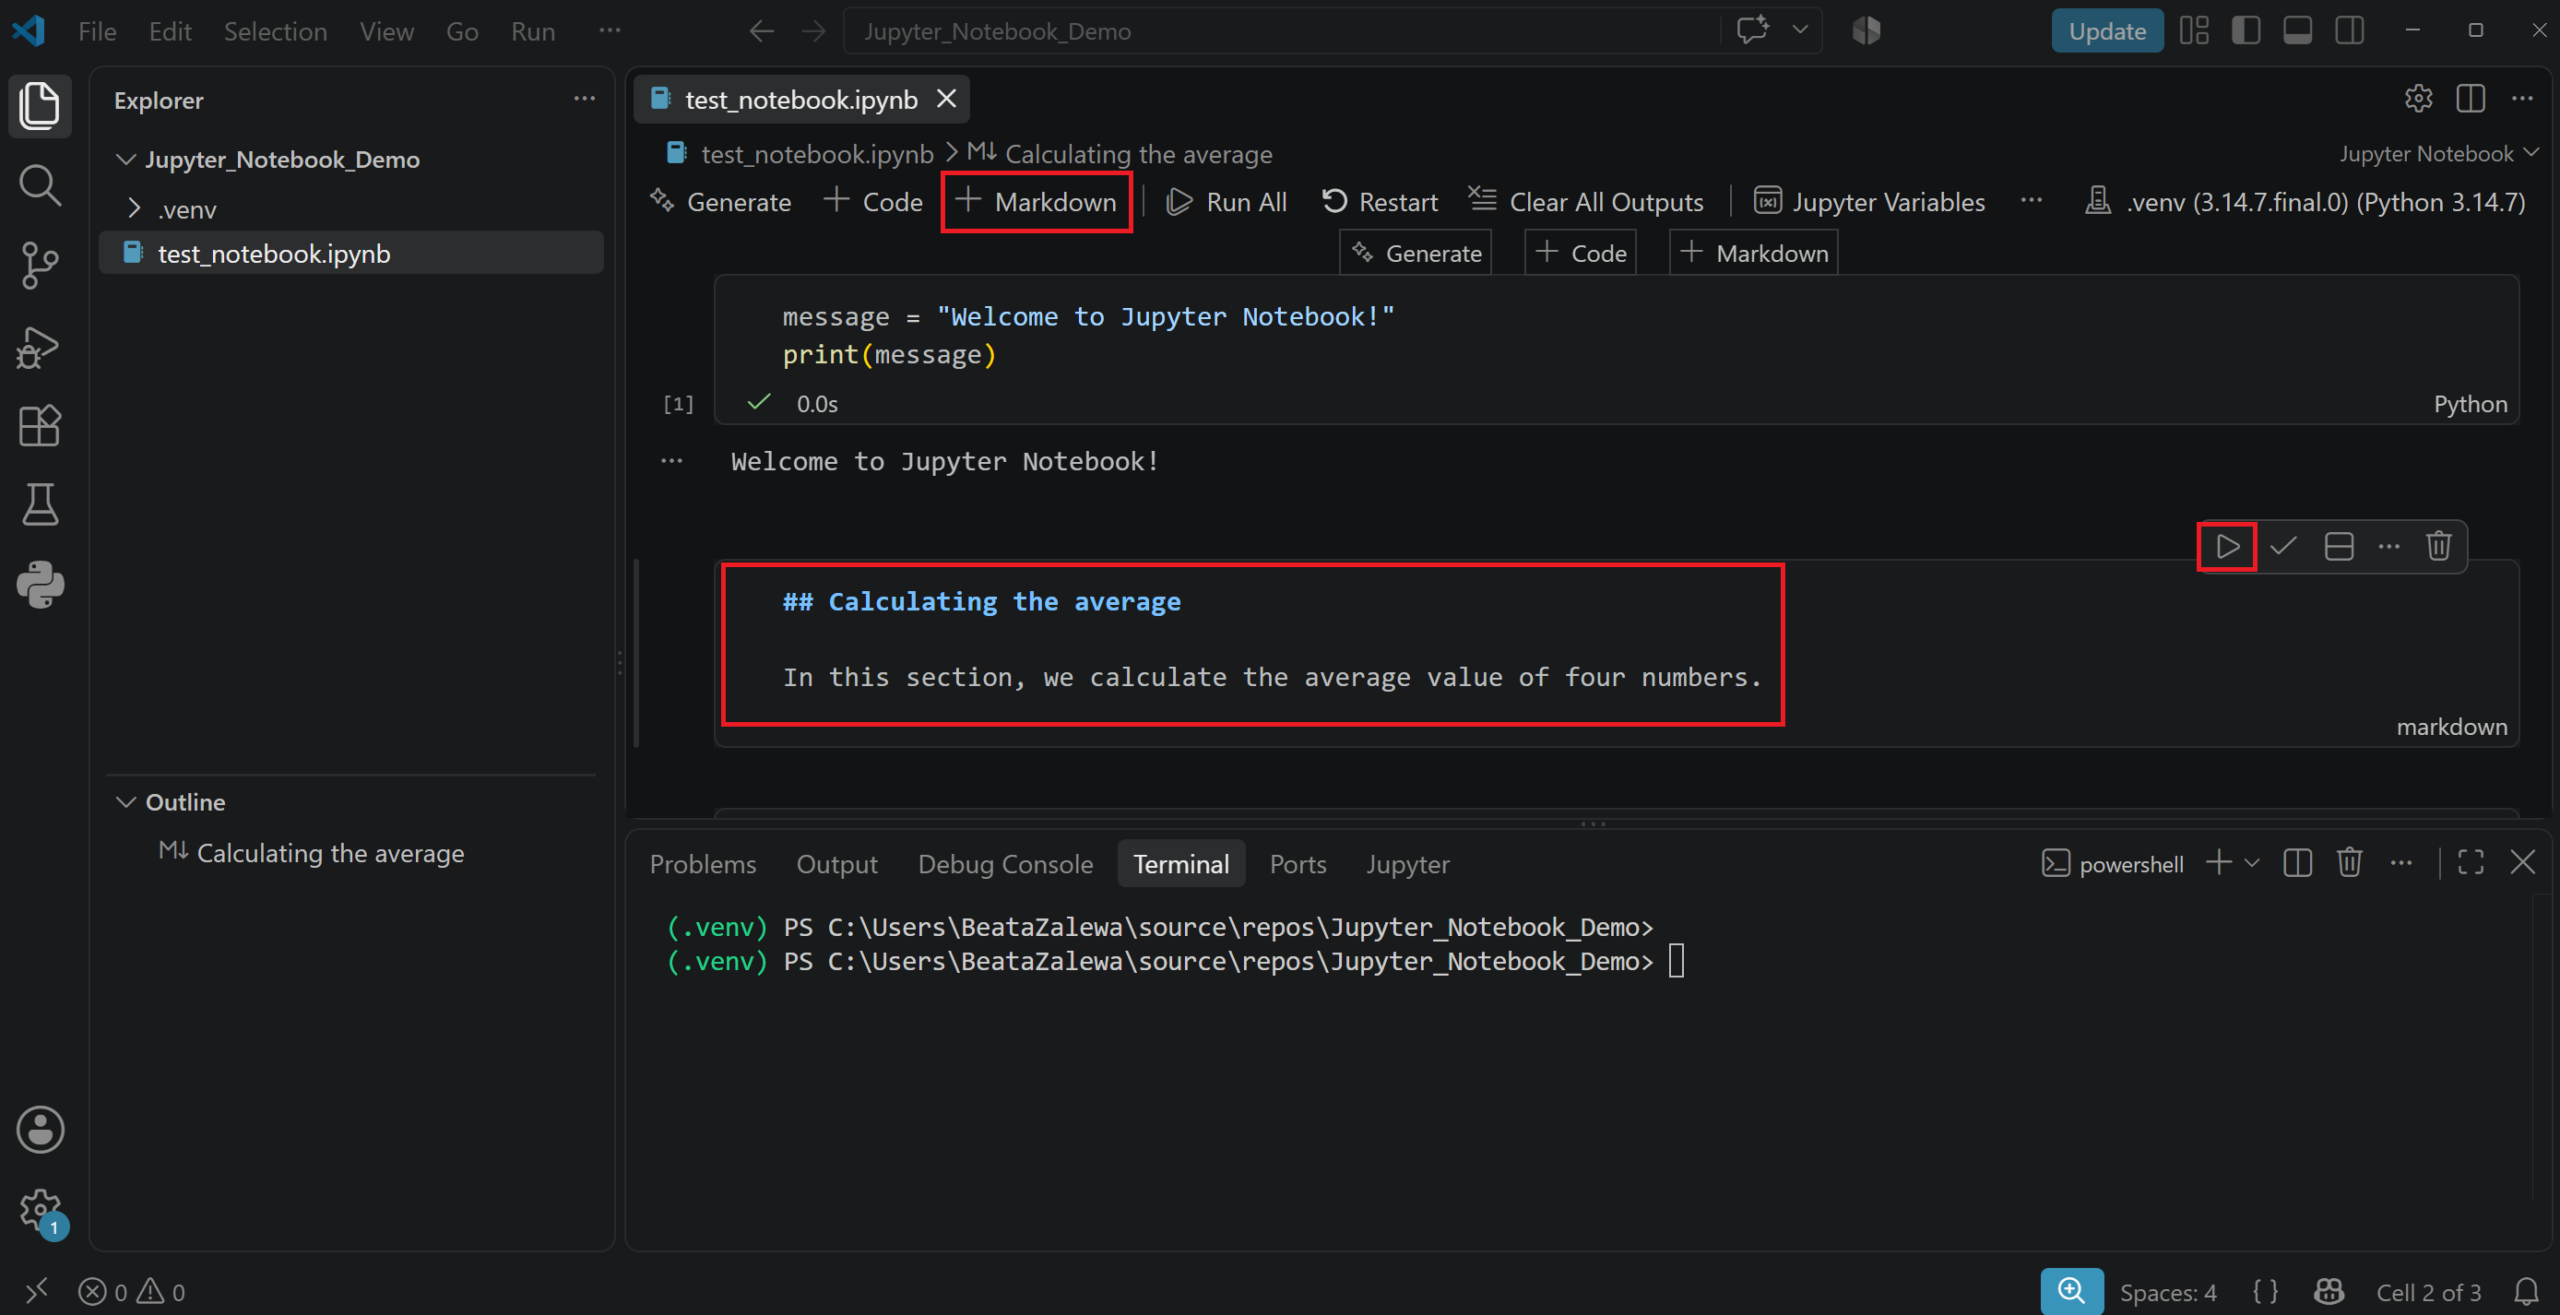
Add a new cell between the two existing cells and change its type from Code to Markdown. Select + Markdown and enter, for example:
## Calculating the average

In this section, we calculate the average value of four numbers.
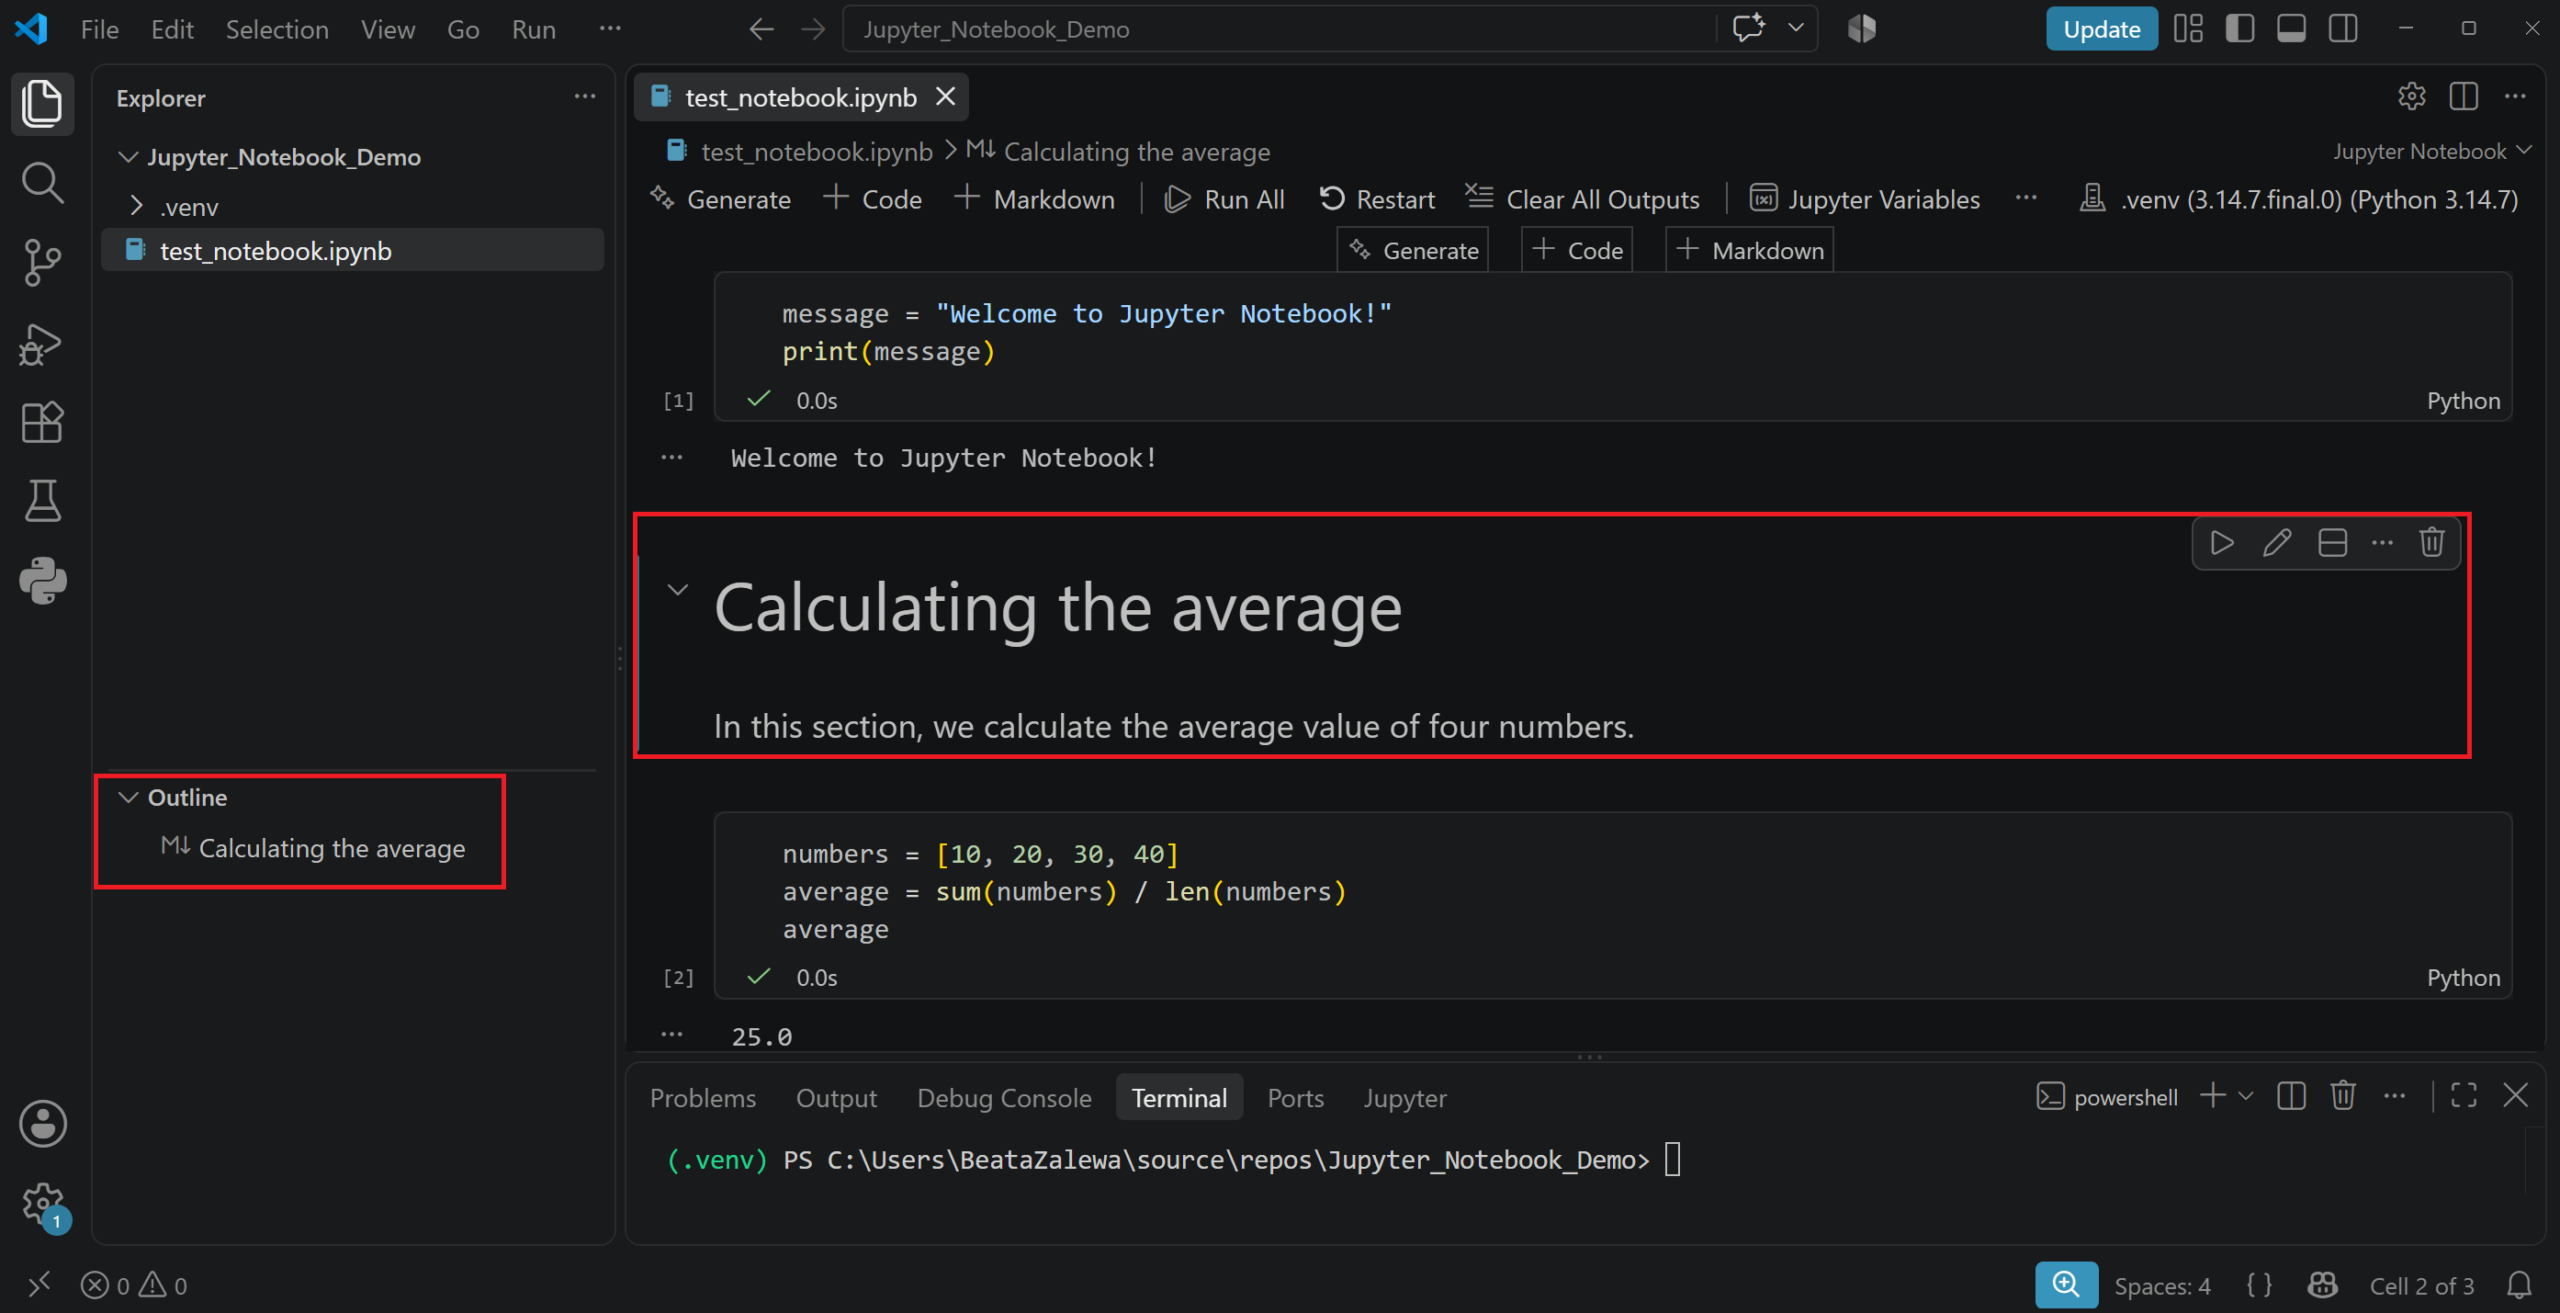
When you run the cell, the text will be formatted.
Tip: Selecting the tick icon in a Markdown cell exits editing mode, whilst the pencil icon allows you to edit the text again.
Headings written in Markdown also create a document structure that can be viewed in the Outline panel.
An example of data analysis in a notebook
Jupyter Notebook is particularly useful when working with Pandas and Matplotlib.
First, add an explanation using + Markdown:
## Creating a simple table

First, import the Pandas library. If it has not yet been installed, run: pip install pandas
The following code imports Pandas into the notebook:
import pandas as pd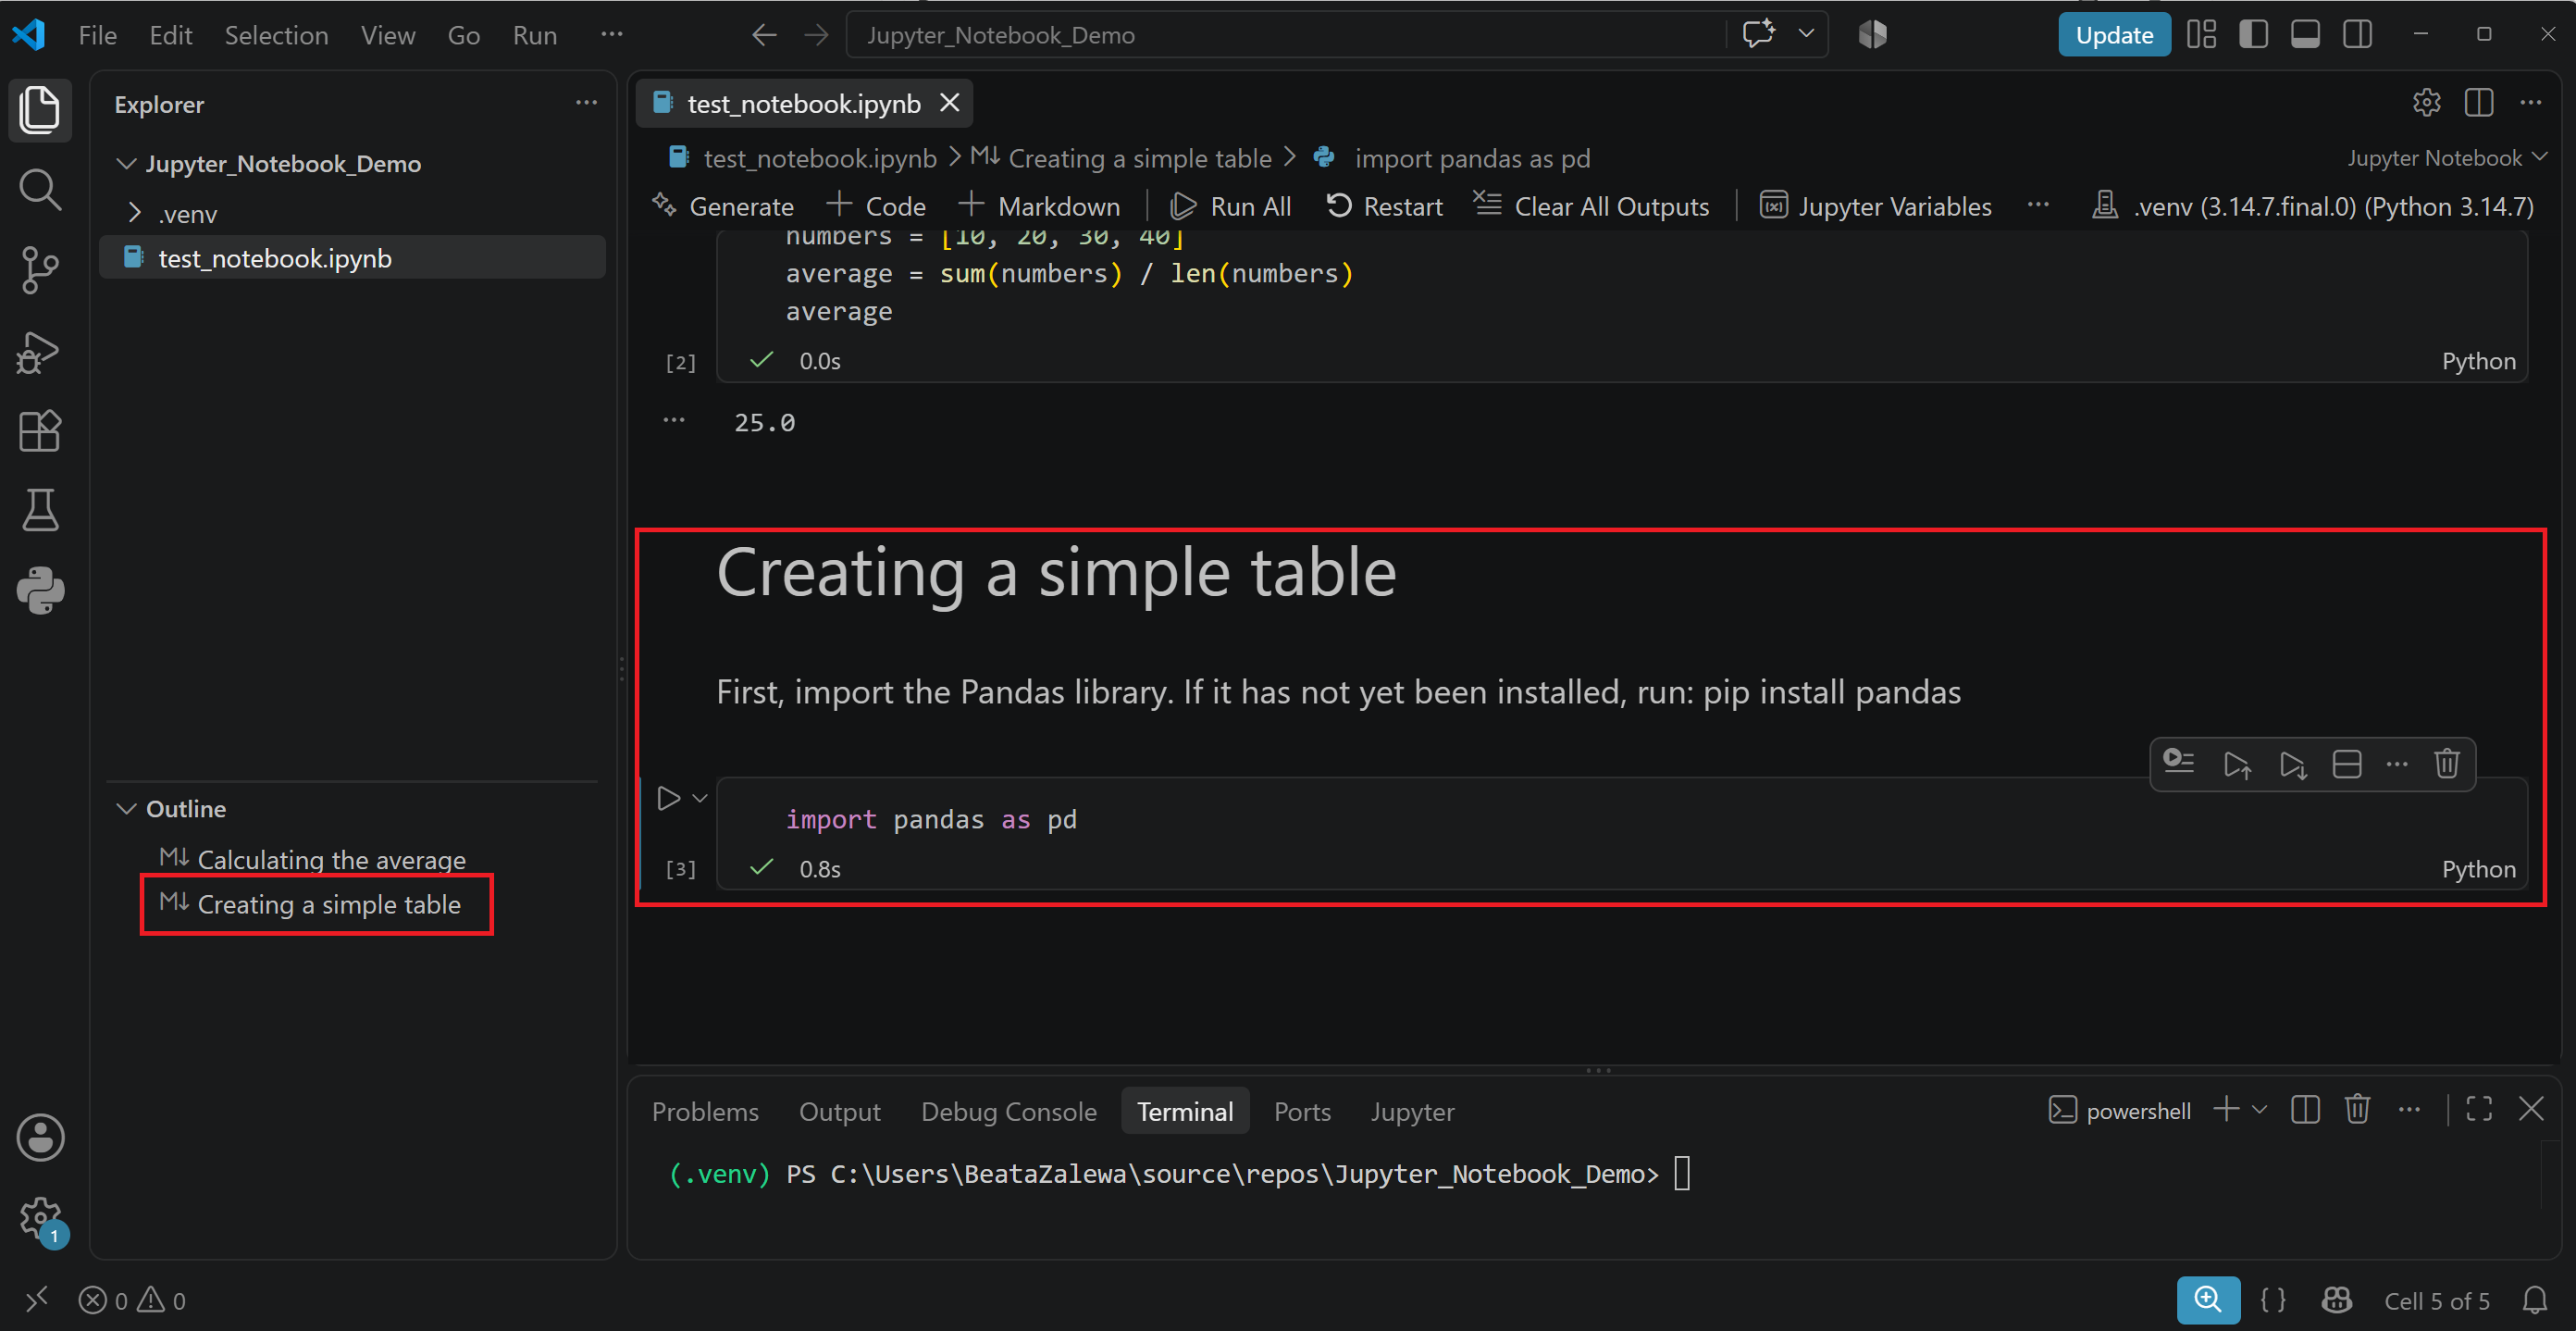
Now add code that creates a simple table:
data = {
    "Product": ["A", "B", "C"],
    "Sales": [120, 180, 150]
}

sales = pd.DataFrame(data)
sales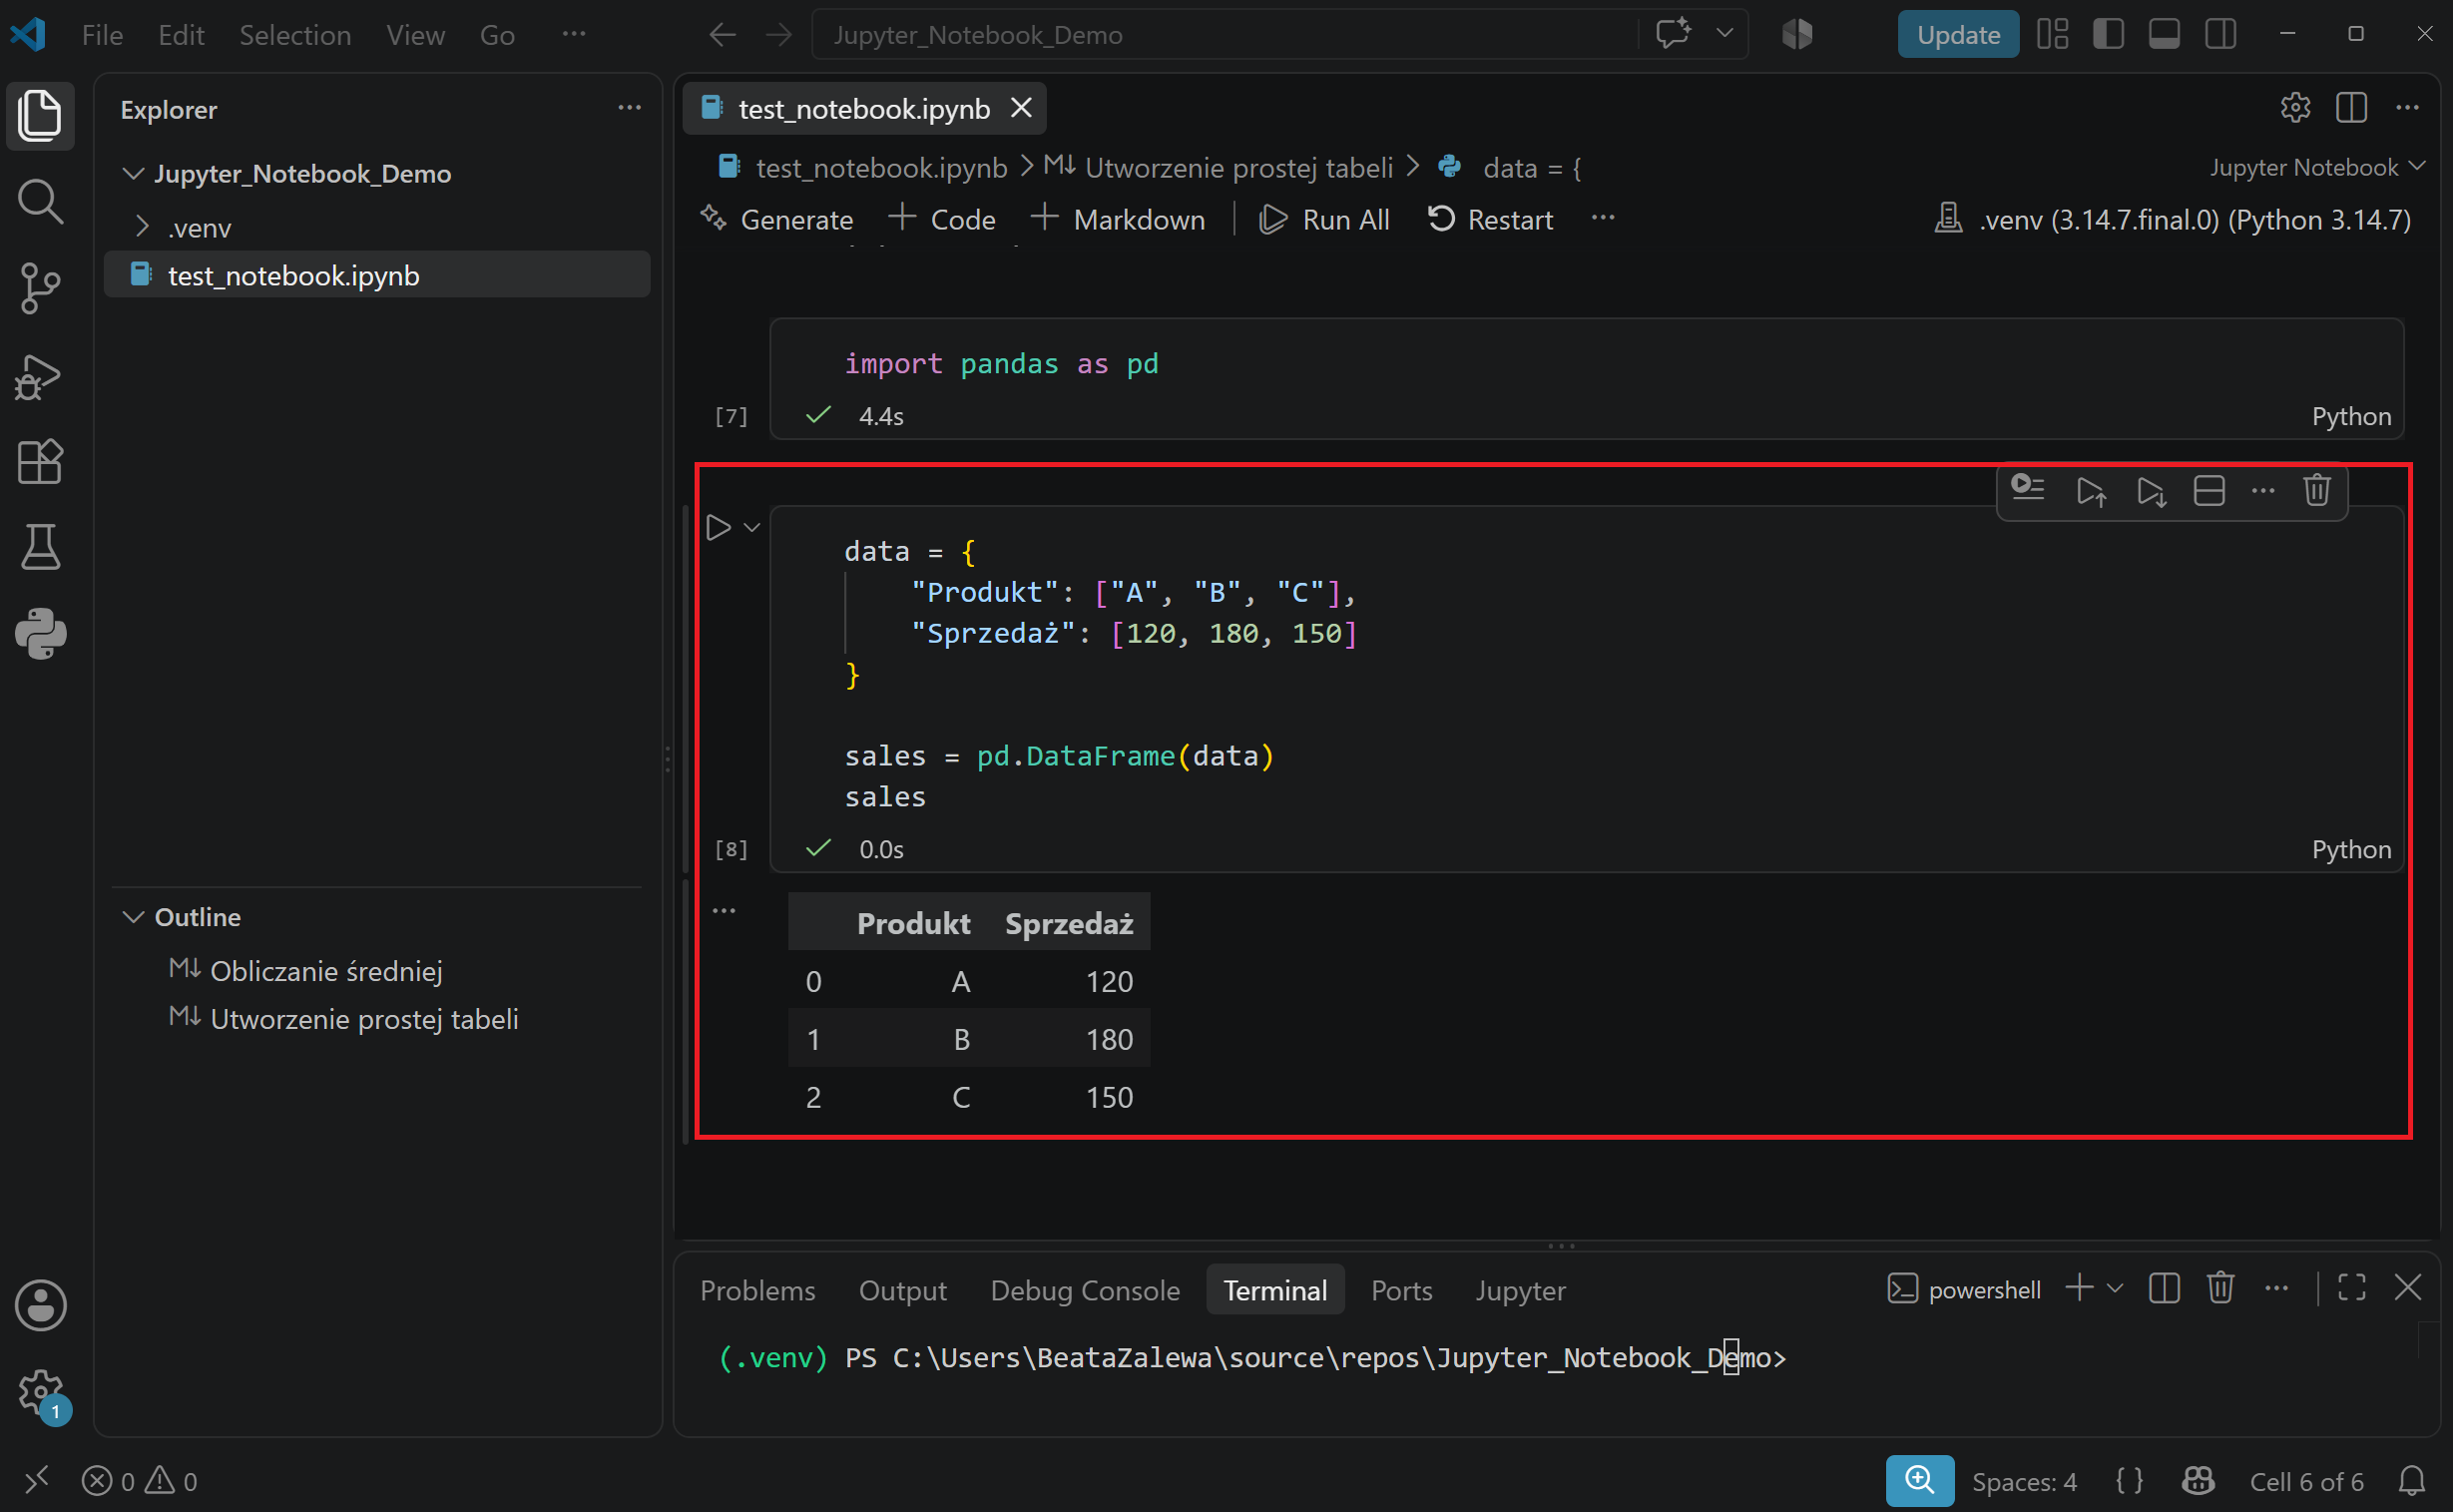
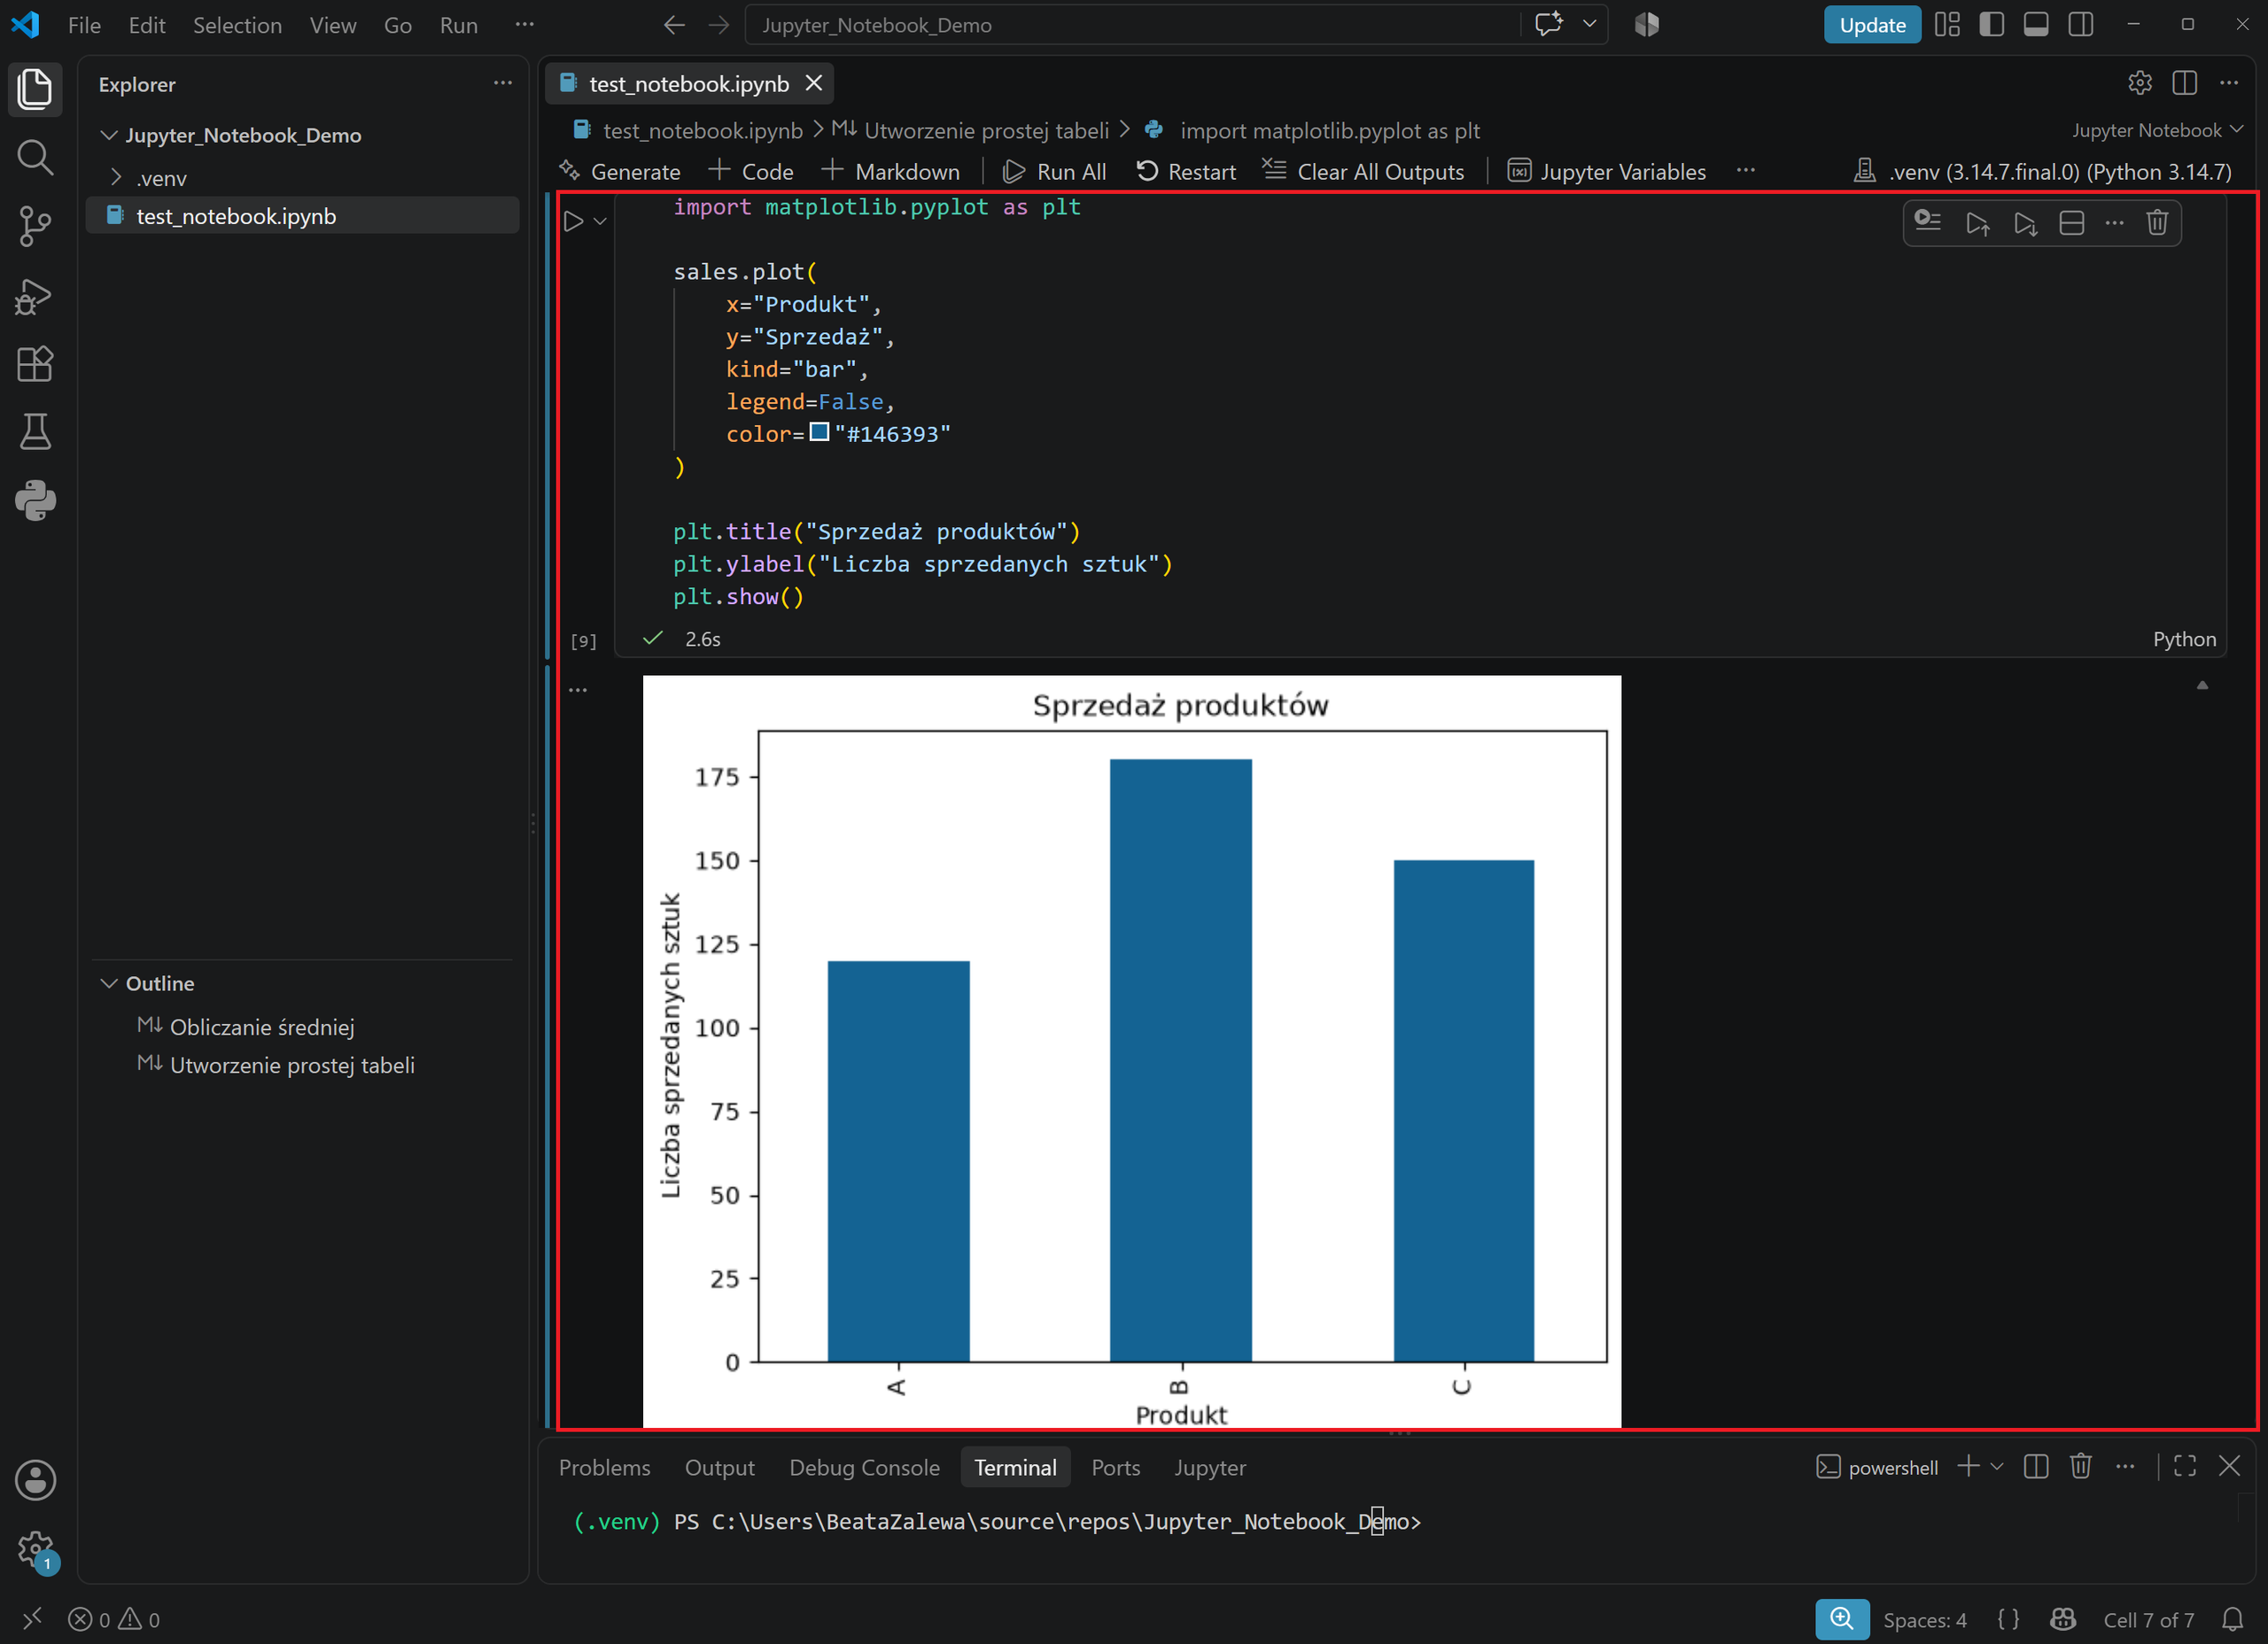
You can create a chart in the next cell:
import matplotlib.pyplot as plt

sales.plot(
    x="Product",
    y="Sales",
    kind="bar",
    legend=False,
    color="#146393"
)

plt.title("Product sales")
plt.ylabel("Units sold")
plt.show()
The table and chart will appear beneath their respective cells. You can subsequently modify and run the code again without executing the entire notebook from the beginning.
The order in which cells are run matters
A notebook retains the state of the current session. If you create a variable in the first cell, another cell can use it. However, this state is lost when the kernel is closed or restarted.
Beginners are often surprised when a cell that worked a moment earlier produces an error after the file has been reopened. This usually happens because the cells have been run in a different order from the order in which they appear in the document.
Before finishing your work, it is therefore advisable to:
- restart the kernel;
- select Run All;
- confirm that every cell runs successfully from beginning to end.
This test ensures that the notebook does not depend upon variables left in memory after earlier experiments.
How to install missing libraries
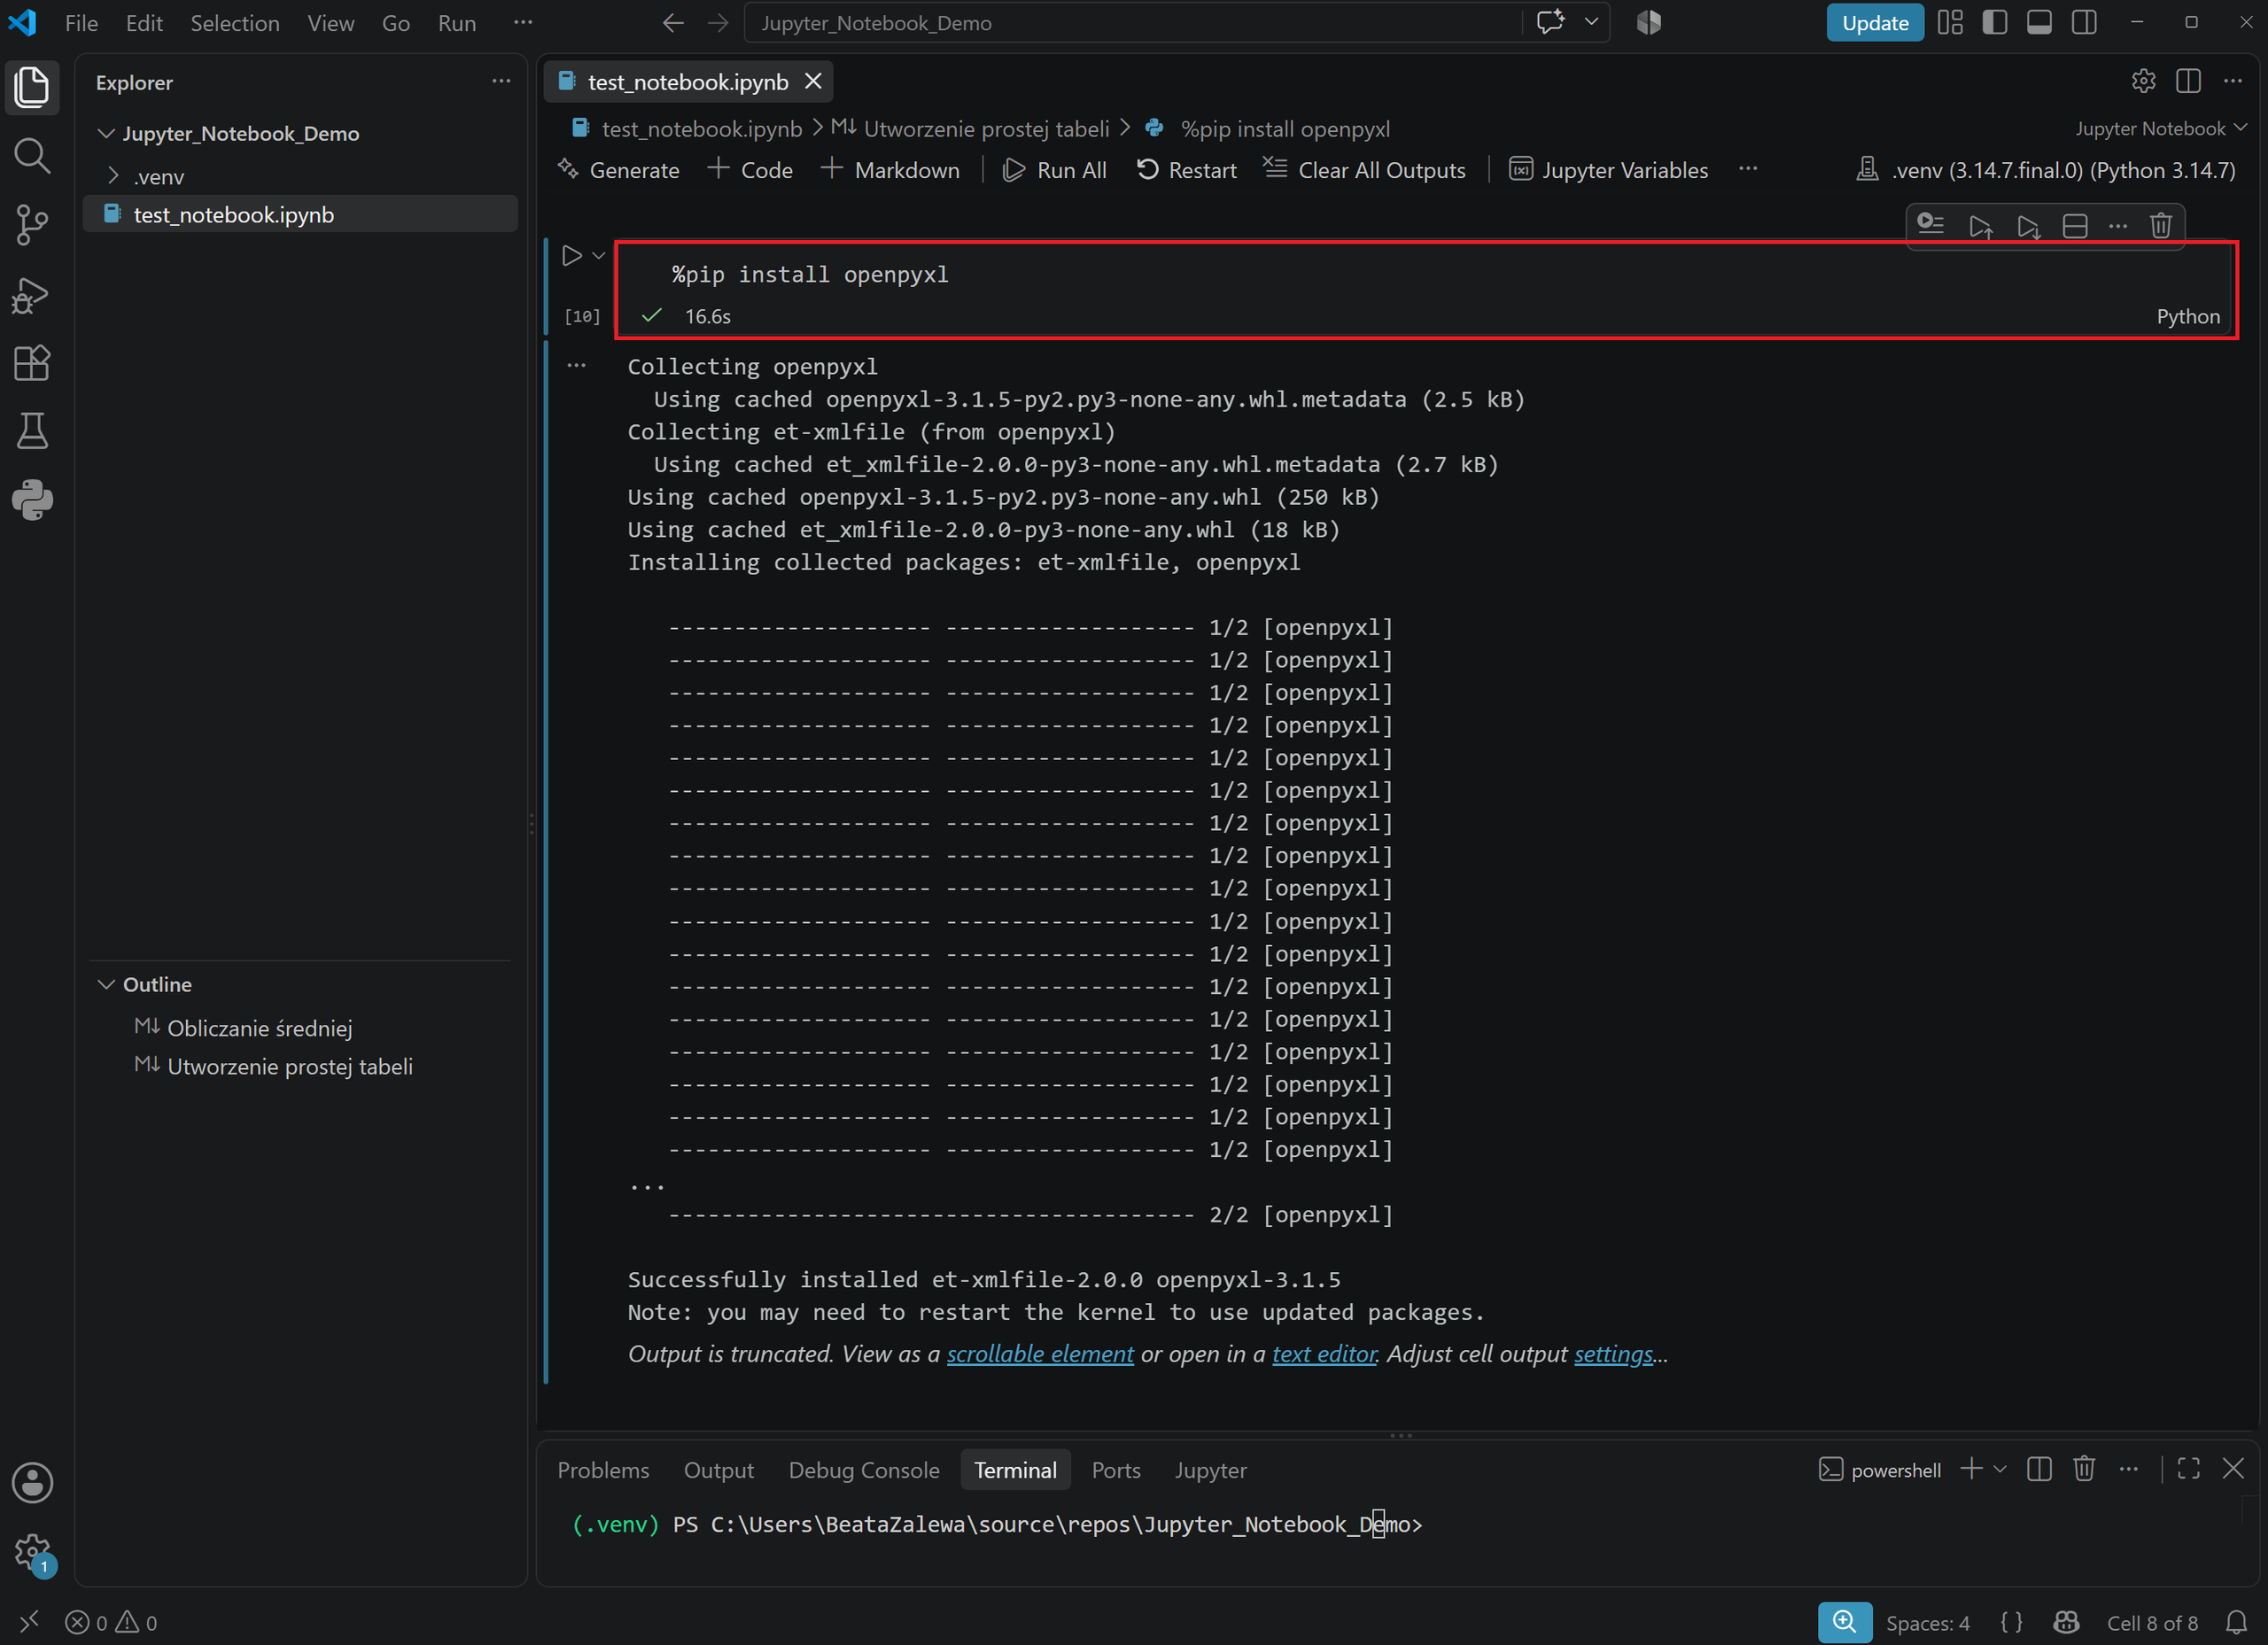
If you encounter a ModuleNotFoundError, begin by checking the name of the active kernel. Then install the missing library in the same environment.
You can install a package directly from a notebook cell:
%pip install openpyxlThe %pip command is useful in notebooks because it installs the package in the environment associated with the current kernel. You may need to restart the kernel after installation.
Common problems with Jupyter Notebook in VS Code
Visual Studio Code does not display the kernel
First, check that the Python and Jupyter extensions are enabled. Then open the Command Palette and run Python: Select Interpreter. Choose the correct environment and use Select Kernel in the notebook again.
If the environment still does not appear in the list, activate it in the terminal and run:
python -m pip install --upgrade ipykernelA ModuleNotFoundError appears
This error usually means that the library has not been installed or has been installed in a different environment.
Check the interpreter path used by the notebook by running:
import sys
print(sys.executable)
The displayed path shows which Python installation is being used by the kernel.
A cell continues running indefinitely
Select Interrupt on the notebook toolbar. If the process still does not respond, select Restart Kernel.
Bear in mind that restarting the kernel removes all variables stored in memory. You will therefore need to run the required cells again.
Code cannot be run in a downloaded project
Visual Studio Code may open an unfamiliar folder in Restricted Mode. The Workspace Trust feature prevents potentially harmful code from being executed automatically.
Only trust notebooks and projects when you know and understand their source.
An .ipynb file can contain code that deletes data, downloads files or sends information to an external service. You should therefore review every cell before using Run All.
How to save and export a notebook
You can save a notebook using the usual Ctrl+S keyboard shortcut. The output generated by individual cells can be stored together with the code, provided that it has not been cleared beforehand.
To export the document, open the menu represented by three dots on the notebook toolbar and select Export.
Visual Studio Code supports exports to formats including:
- a Python .py file;
- an HTML document;
- a PDF document.
Exporting directly to PDF may require an additional TeX installation. For a simple notebook, it may be easier to export it to HTML first and then use the browser’s print function to save the page as a PDF.
Good practices when working with .ipynb files
To make your notebook clear and reproducible on another computer:
- explain the purpose of each section using Markdown cells;
- place library imports near the beginning of the document;
- never store passwords, tokens or API keys directly in notebook cells;
- create a separate virtual environment for each project;
- record dependencies in a
requirements.txtfile; - run the entire notebook from the beginning before sharing it;
- remove confidential data and unnecessary output;
- give variables names that clearly describe their purpose.
You can save a list of the libraries used by the project with:
python -m pip freeze > requirements.txt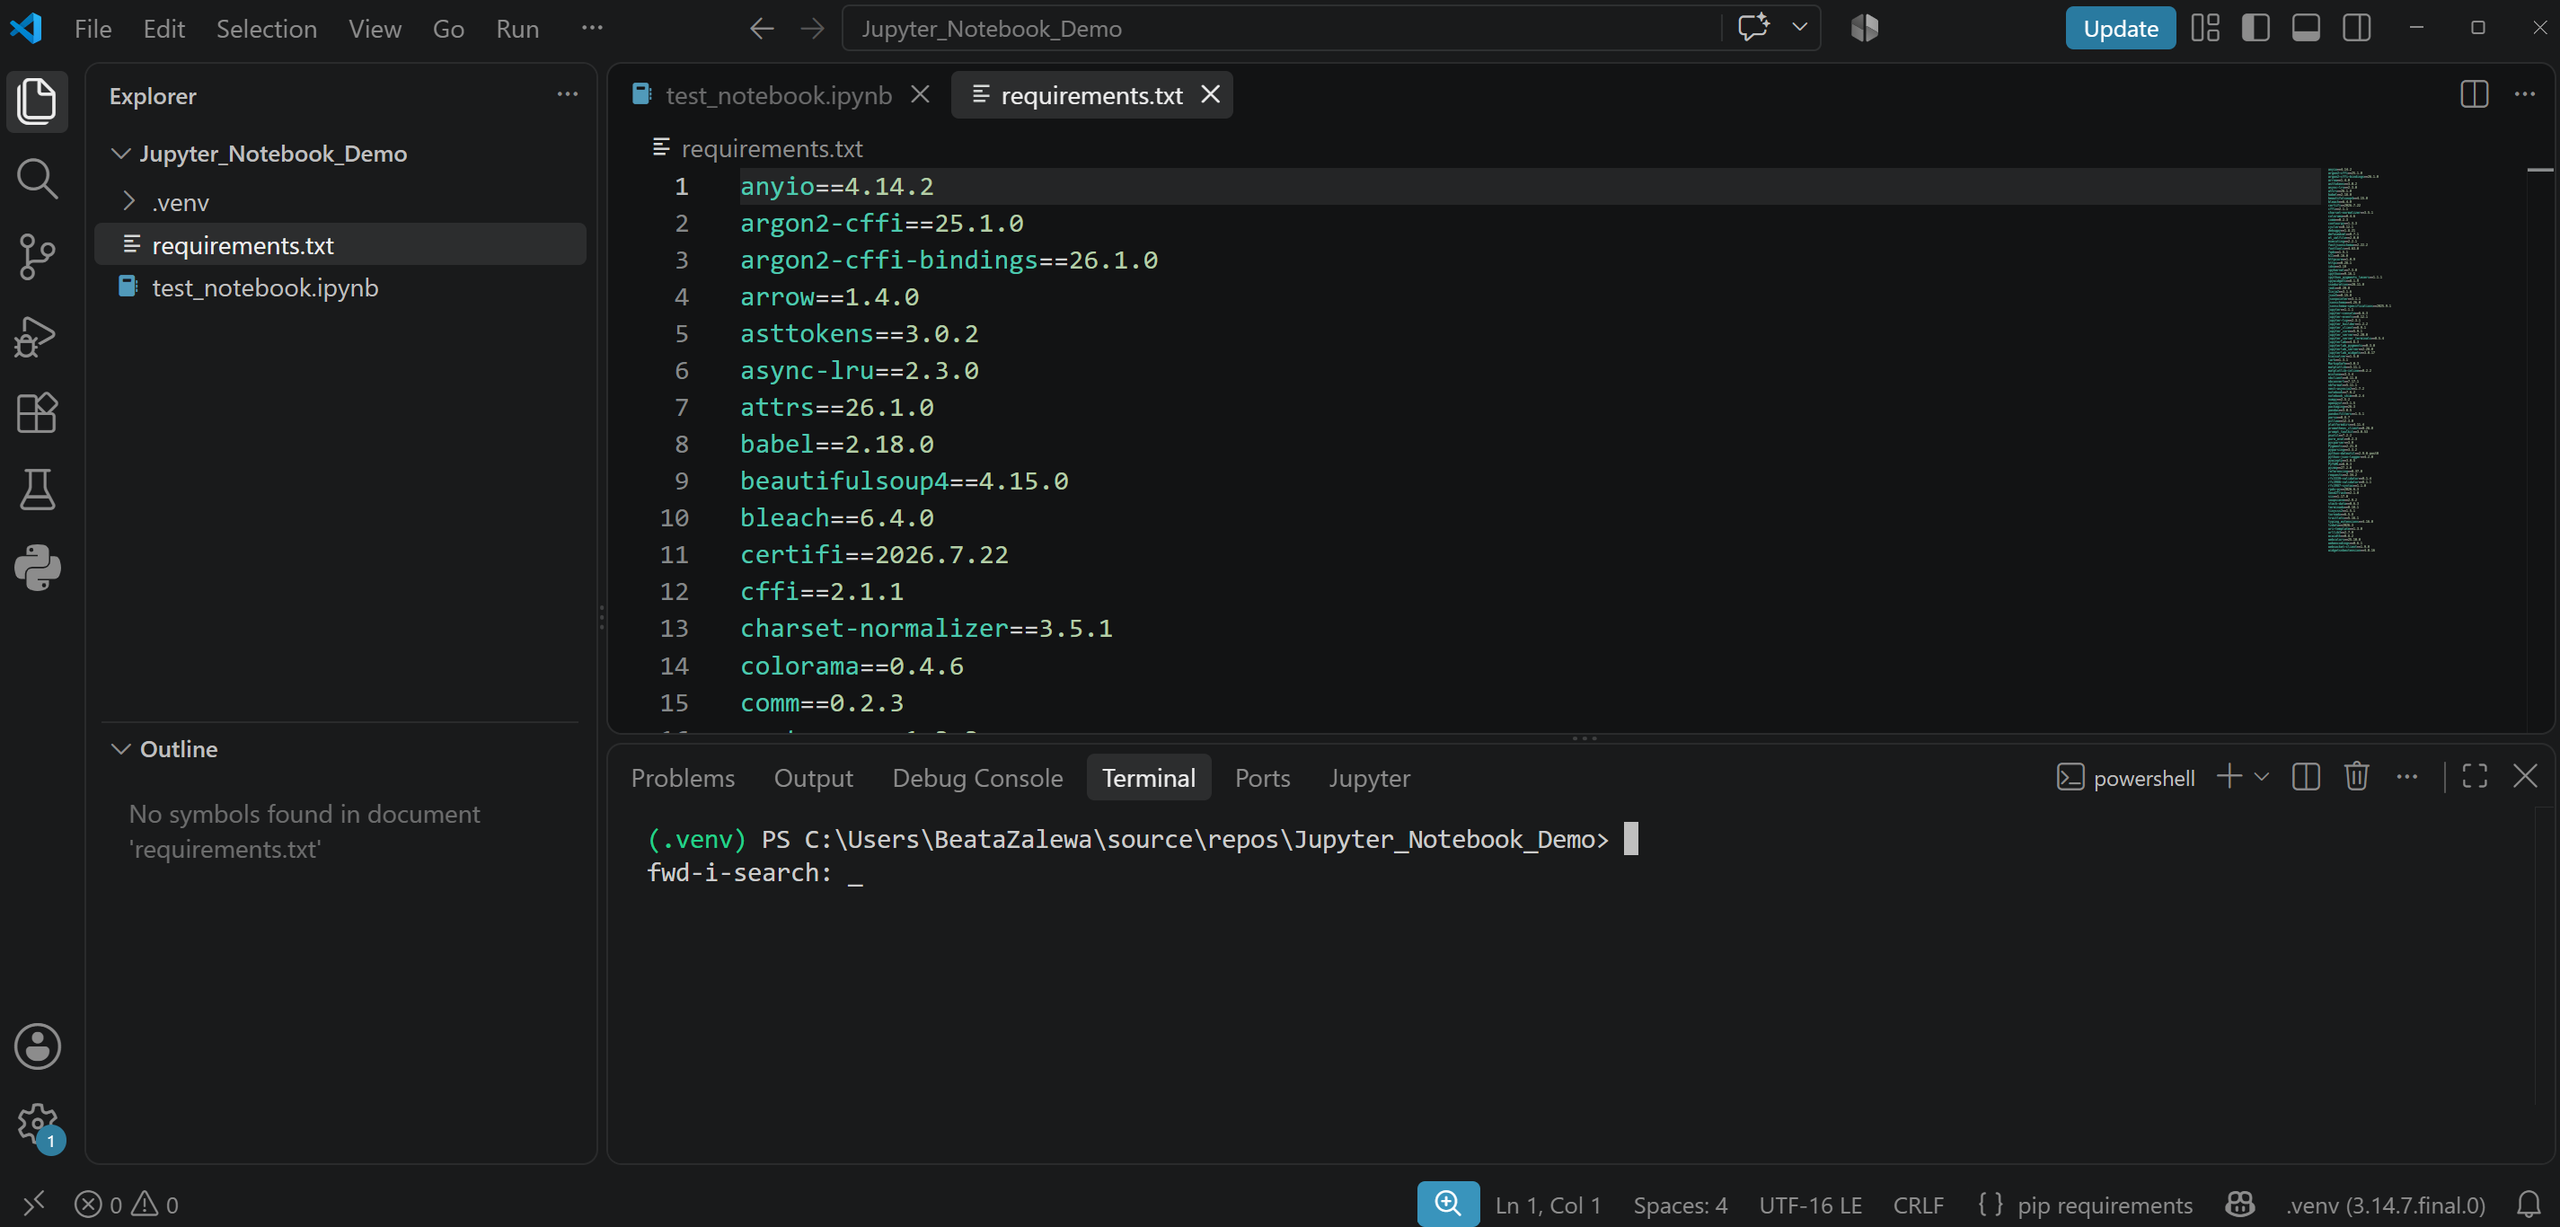
On another computer, the same packages can be installed with:
python -m pip install -r requirements.txtJupyter Notebook in VS Code – summary
Working with Jupyter Notebook in VS Code does not require a complicated configuration. You simply need to install Python, add the Python and Jupyter extensions, prepare an environment and select the appropriate kernel. You can then run code in manageable sections, add explanations with Markdown and view tables or charts directly within the document.
The most important principle is to keep your environments consistent. The notebook should use the same Python interpreter in which the required libraries have been installed. Once you remember this, most common problems become considerably easier to resolve.
If you would like to learn Python, data analysis or the practical application of AI tools, explore the ZALNET training and consulting services. You can also find further information about the Jupyter project in its official documentation.